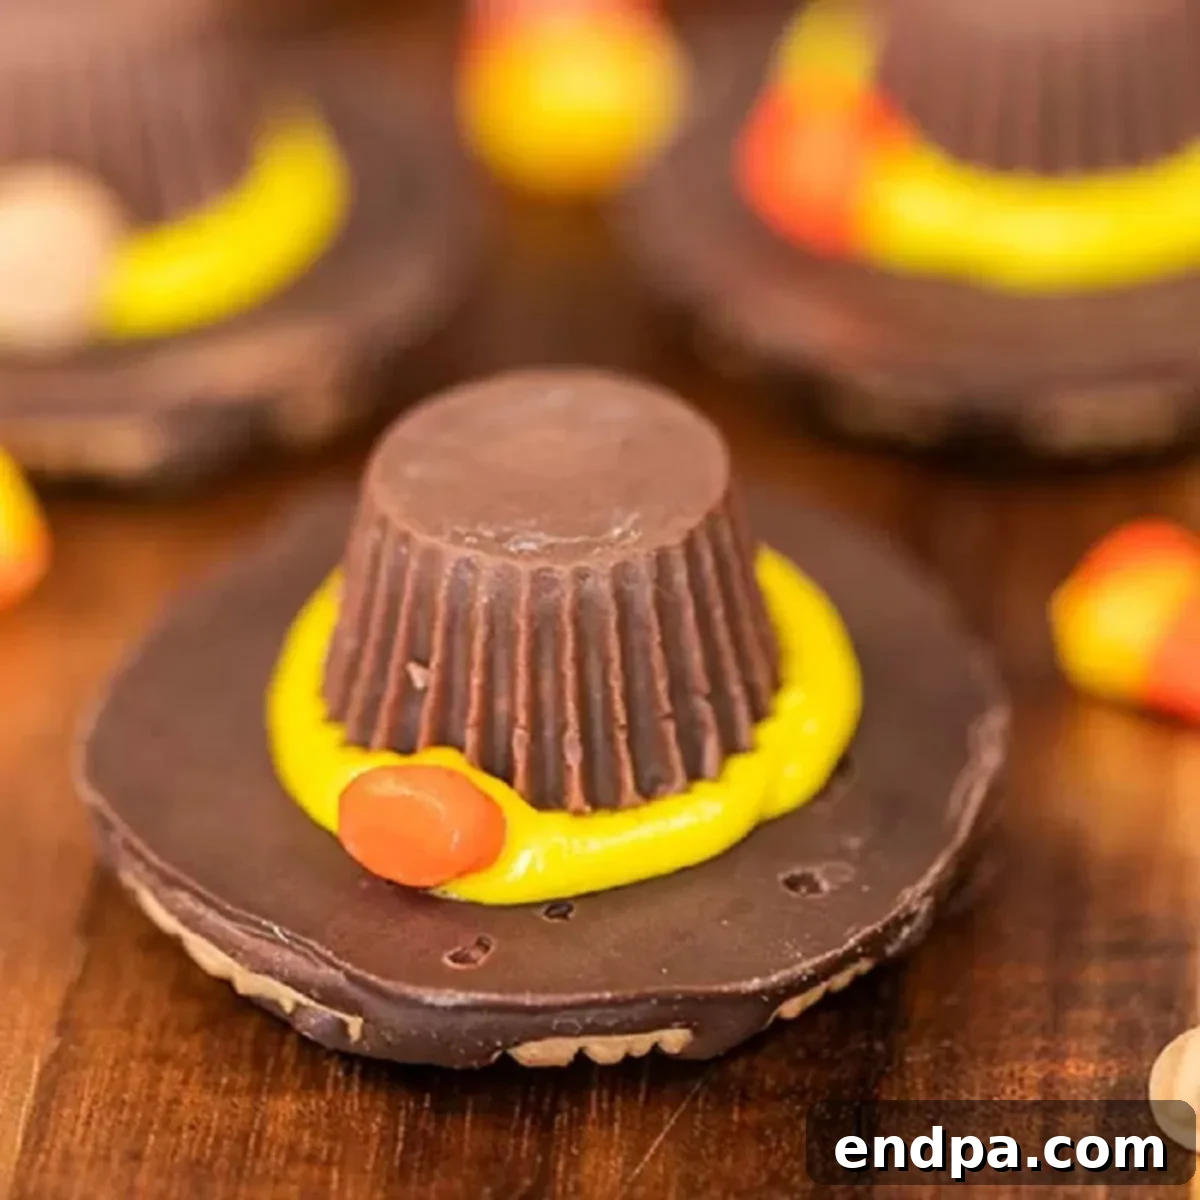
Get ready to infuse your Thanksgiving celebrations with an extra dose of charm and sweetness with these utterly adorable Pilgrim Hat Cookies! Designed to capture the festive spirit of the holiday, these delightful treats are guaranteed to bring smiles to both children and adults alike. The most remarkable aspect? You only require four incredibly simple ingredients to create these iconic no-bake confections, making them the perfect solution for busy schedules when oven space is limited and time is of the essence. Say goodbye to complicated recipes and hello to effortless holiday fun!
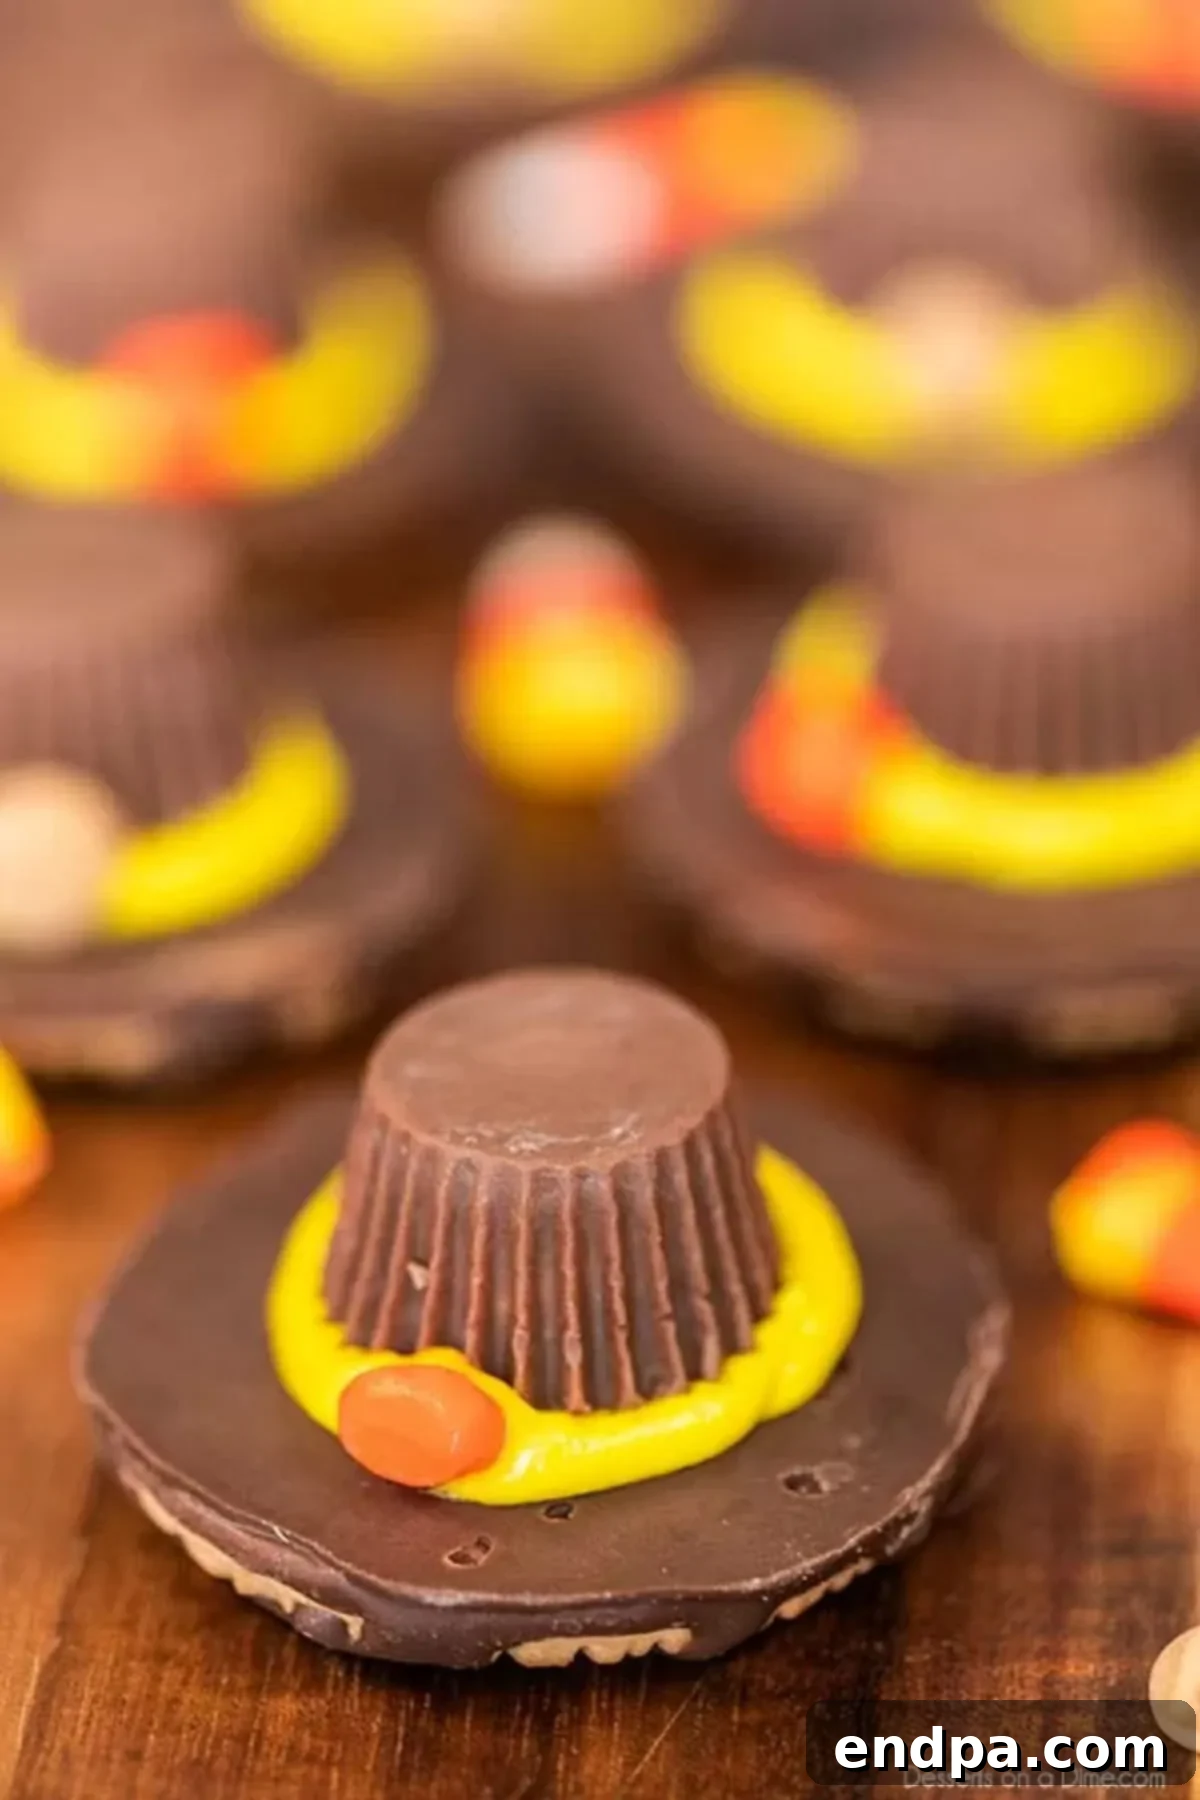
Thanksgiving is a time deeply rooted in tradition, gratitude, and the joy of sharing a bountiful feast with loved ones. While the spotlight often shines on elaborate roasts and intricate homemade pies, there’s always a special place for a dessert that’s both easy to prepare and universally loved. These no-bake Thanksgiving pilgrim cookies are precisely that—a brilliant way to add a touch of playful holiday whimsy without the common stresses associated with extensive baking. Their charming design evokes the classic pilgrim hat, making them instantly recognizable and a delightful conversation starter at any gathering.
The process of making these cookies is not only straightforward but also incredibly fun, transforming it into an enjoyable activity for the whole family. Imagine the laughter and bonding as little hands help assemble these treats! With just four readily available ingredients, anyone, regardless of their culinary skill level, can successfully create a batch of these enchanting cookies. They consistently prove to be a crowd favorite, disappearing quickly from any dessert spread.
Children, in particular, will be absolutely enchanted by these delightful cookies. Their playful appearance is matched only by their irresistibly tasty combination of rich chocolate and creamy peanut butter. Each miniature hat is perfectly sized for small hands, making them easy to pick up and enjoy. These fun little pilgrim hat cookies are truly guaranteed to be a hit with every guest at your Thanksgiving feast. For those eager to explore more festive delights, we encourage you to browse our extensive collection of Thanksgiving Cookies Recipes. And for another unique and equally delightful treat, don’t miss our charming Thanksgiving Cake Pops Recipe, perfect for adding variety to your holiday dessert table.
The beauty of no-bake desserts extends beyond mere convenience; they offer a wonderful opportunity to involve younger family members in the exciting holiday preparations. If you’ve enjoyed crafting our spooky Witch Hat Cookies for Halloween or our adorable Turkey Cupcakes, you’ll find that these Pilgrim Hat Cookies seamlessly integrate into your repertoire of simple, yet highly impressive, holiday creations. No-bake treats truly embody the spirit of ease and enjoyment, allowing you to maximize your time celebrating and minimize your time confined to the kitchen.
While the convenience of no-bake options is undeniable, we also appreciate the satisfaction that comes from traditional baking. Should you find yourself in the mood to fire up the oven, we have a wealth of inspiration for you. Be sure to explore our collection of 51 Easy Thanksgiving Cupcakes, offering a diverse array of festive flavors and designs. Alternatively, for another fantastic baking shortcut that yields consistently delicious results, learn How to Make Cake Mix Cookies. However, for sheer simplicity, undeniable charm, and a quick turnaround, these 4-ingredient Pilgrim Hat Cookies remain a standout choice for adding a special touch to your Thanksgiving dessert spread.
Table of Contents
- Why We Love This Recipe: The Perfect Thanksgiving Treat
- Essential Ingredients for Your Pilgrim Hat Cookies
- Creative Recipe Variations for Customizing Your Pilgrim Hat Cookies
- Step-by-Step Guide: Assembling Your Pilgrim Hat Cookies
- Expert Pro Tips for Perfect Pilgrim Hat Cookies
- Storage Suggestions for Freshness and Convenience
- Frequently Asked Questions About Pilgrim Hat Cookies
- Full Recipe Card for Pilgrim Hat Cookies
Why We Love This Recipe: The Perfect Thanksgiving Treat
These Pilgrim Hat Cookies have rapidly become a beloved tradition in countless homes, particularly during the bustling and often overwhelming holiday season. As enthusiasts of festive treats, we are especially drawn to recipes that simplify our lives without ever compromising on celebratory appeal. These cookies, for instance, boast an astonishingly quick preparation time, demanding less than 30 minutes from the moment you gather your ingredients to when they’re fully assembled. This exceptional speed is a genuine game-changer, enabling you to effortlessly whip up a substantial batch even on Thanksgiving Day itself, thereby freeing up invaluable oven space and precious time. More importantly, it allows you to dedicate more moments to connecting and celebrating with your cherished family and friends.
Beyond their rapid assembly, these charming cookies serve as an impeccable addition to any Thanksgiving table. Their adorable and instantly recognizable appearance immediately evokes the heartwarming spirit of the holiday, transforming them from merely a dessert into a delightful and edible centerpiece. We’ve often artfully arranged them on elegant platters, nestled amongst colorful autumn foliage or miniature pumpkins, creating a whimsical and delicious decoration that consistently captivates guests and sparks joyful conversation. Furthermore, their cost-effectiveness is another significant advantage; requiring only four widely available and inexpensive ingredients, this dessert proves that you don’t need exotic or pricey components to craft something truly special and memorable for the holidays. It’s a testament to simple ingredients coming together to create extraordinary joy.
The inherent simplicity of this recipe also makes it an ideal entry point for involving children in the exciting world of kitchen creations. Kids naturally love to help with holiday preparations, and these cookies provide a safe, engaging, and remarkably mess-minimal way for them to contribute their efforts. From the satisfying task of unwrapping the Reese’s cups to the careful placement of the candy corn buckle, each step is manageable and enjoyable for little hands. This hands-on experience not only fosters a wonderful sense of accomplishment but also helps forge precious holiday memories that will be treasured for years to come. This unbeatable combination of speed, undeniable charm, affordability, and family-friendliness perfectly encapsulates why these Pilgrim Hat Cookies stand out as a perennial holiday favorite.
Essential Ingredients for Your Pilgrim Hat Cookies
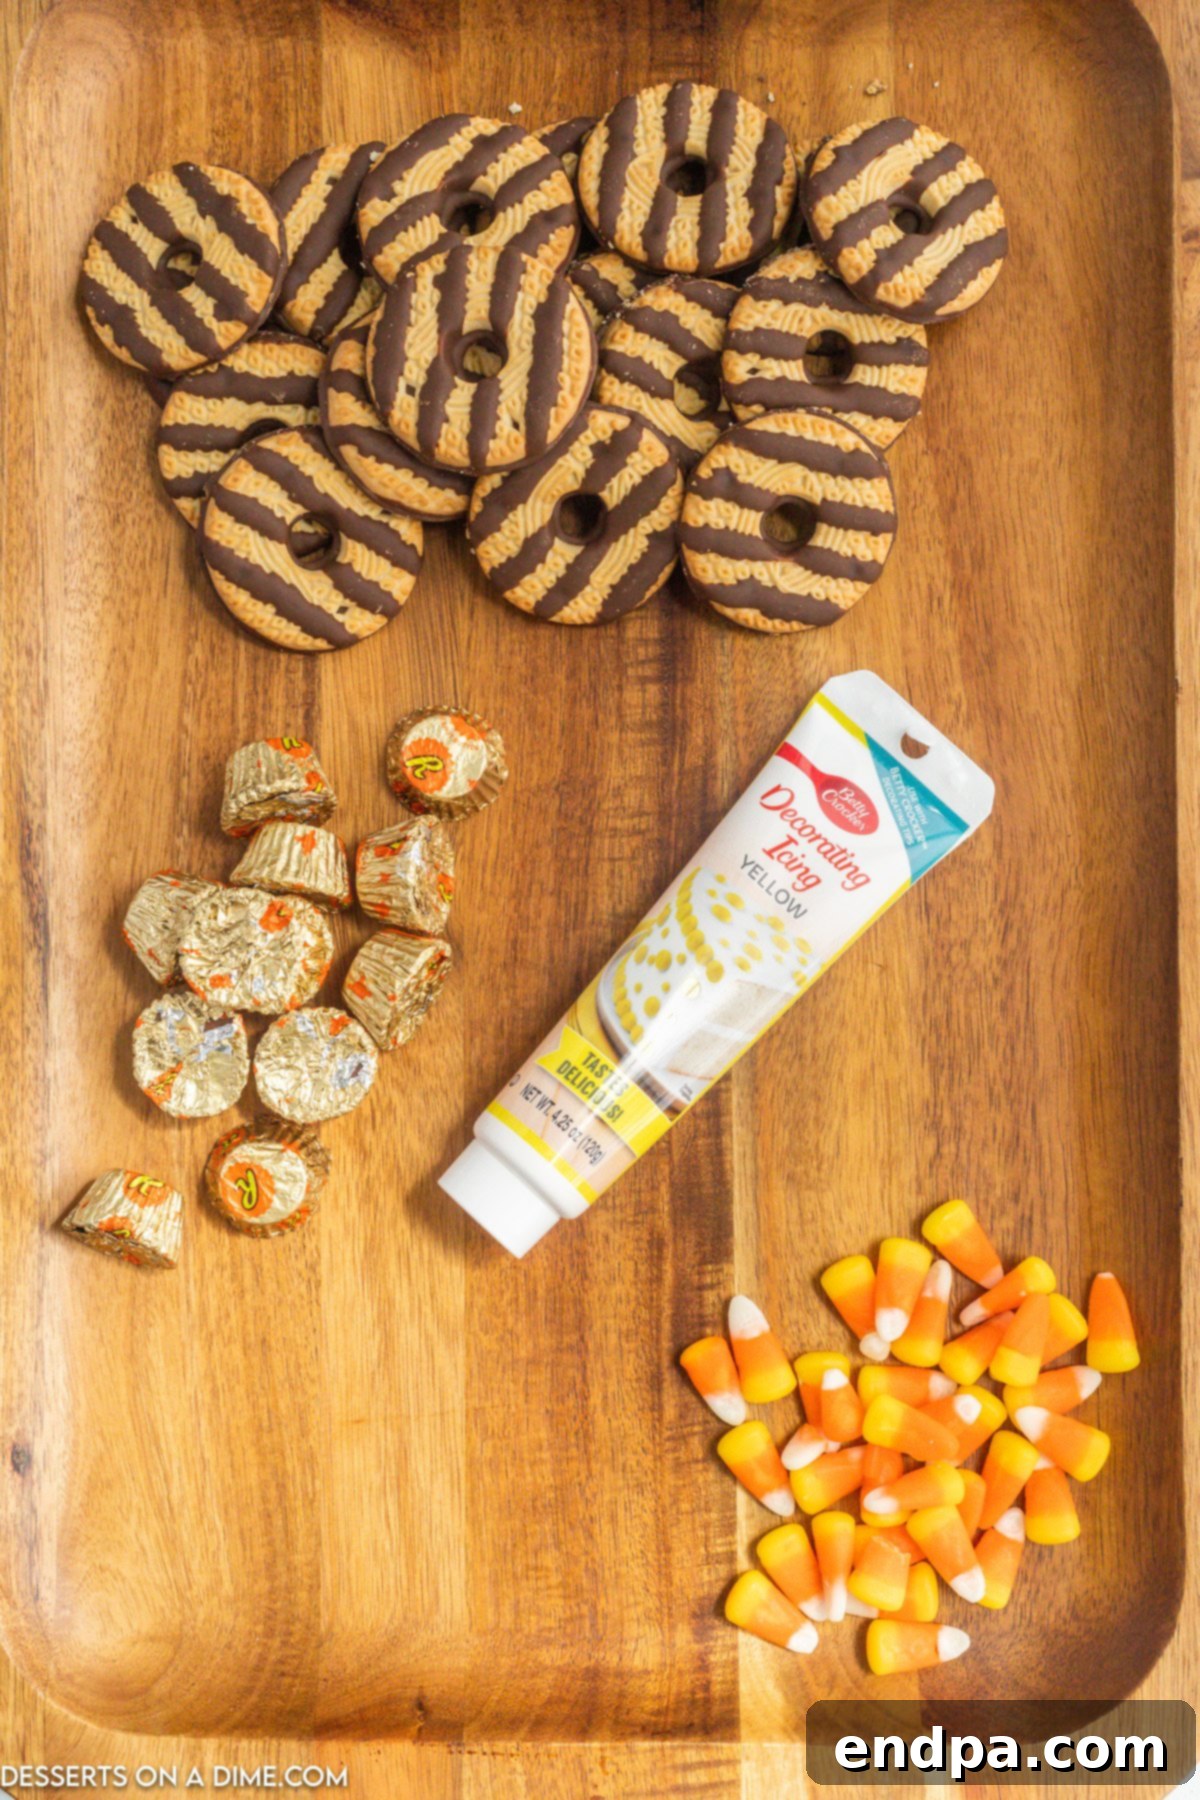
The true genius of these delightful Pilgrim Hat Cookies lies in their incredibly concise and universally accessible ingredient list. You’ll likely be amazed at how such a straightforward combination of common pantry staples can magically transform into such a festive, eye-catching, and utterly delicious treat. Here’s a detailed look at the fundamental components you’ll need to bring these charming hats to life:
- Fudge Stripes Cookies: These iconic cookies form the indispensable foundation of our pilgrim hats. Their distinct flat, round base, already generously coated in rich, dark chocolate, provides the perfect stable platform for building the hat. Crucially, the signature fudge stripes encircling the edge effortlessly mimic the appearance of a hat brim, eliminating an extra step in your preparation and instantly adding visual authenticity and appeal. While any brand of similar chocolate-coated shortbread-style cookie could technically work, Fudge Stripes are truly ideal for their classic, ready-made design and appealing taste.
- Miniature Reese’s Peanut Butter Cups: These beloved candies are the stars that form the distinctive “hat” portion of our pilgrim creations. Their unique shape and the irresistible combination of creamy peanut butter encased in smooth milk chocolate provide a flavor profile that perfectly complements the fudge cookies. A vital tip: make sure to unwrap all of your Reese’s cups before you begin the assembly process. This ensures a seamless and uninterrupted creative flow, preventing sticky fingers and fumbling during delicate placement. Opting for the miniature size is key for maintaining the correct proportion and adorable aesthetic of the pilgrim hat.
- Pieces of Candy Corn: To craft the quintessential, recognizable buckle on the pilgrim hat, you will selectively use the vibrant orange segment of traditional candy corn. Its distinct triangular (or sometimes trapezoidal) shape and bright color instantly add that authentic, nostalgic touch. You’ll only require a small, precise piece for each cookie, meaning that a standard bag of candy corn will yield many buckles and can be used for other fall-themed decorations as well. This small, specific detail is what truly elevates the cookie from a simple chocolate-peanut butter treat into a cherished and recognizable Thanksgiving emblem.
- Yellow Decorating Icing: This versatile ingredient serves a dual purpose: it acts as the adhesive that securely binds the different components of our hat together, and it also adds a crucial decorative flair. Store-bought tubes of yellow decorating icing are an absolute godsend for this recipe due to their unparalleled convenience and ease of use. The fine tip of these tubes allows for incredibly precise application, making it effortless to pipe a neat, consistent circle for adhering the Reese’s cup and for forming the characteristic yellow frame around the “buckle.” If a vibrant yellow isn’t readily available, any light-colored icing (such as vanilla buttercream) can be easily tinted yellow with a few drops of food coloring, or even melted white chocolate could be used, although yellow best captures the traditional buckle color.
The complete list of ingredients, including precise measurements and quantities for your convenience, is thoughtfully provided in the detailed recipe section located further down this page.
Creative Recipe Variations for Customizing Your Pilgrim Hat Cookies
While the classic Pilgrim Hat Cookie recipe is undeniably charming and delicious in its original form, one of its most appealing attributes is its remarkable versatility. These cookies serve as a fantastic canvas for your creativity, allowing you to easily customize them to align with your personal taste preferences, accommodate available ingredients, or simply to add an extra layer of fun to your holiday preparations. Here are some exciting and inspiring recipe variations you can confidently explore:
- Innovative Candy Choices for the Buckle: If candy corn isn’t a family favorite, or if you’re keen to explore alternative options for creating the iconic hat buckle, you have a plethora of delicious swaps. Consider using small peanut butter chips, which offer a delightful texture and flavor contrast. Miniature yellow or orange M&M’s would also be a perfect fit, adding a pop of color and a satisfying crunch. A tiny dollop of melted white chocolate, carefully tinted with yellow food coloring, can also form a neat buckle. For a more rustic and less sweet appearance, a small chocolate button or a tiny, precisely cut square of a chocolate bar can provide a charming detail.
- Exploring Diverse Cookie Bases: The Fudge Stripe Cookie truly shines as the preferred base for these treats, primarily due to its pre-existing chocolate coating and its distinctive, molded rim that perfectly simulates a hat brim. However, if these aren’t available, or if you simply wish to experiment with different flavors, almost any flat, round cookie can serve as a suitable substitute. Excellent alternatives include classic shortbread cookies, rich chocolate wafers, or even circular graham cracker rounds for a slightly different texture. If your chosen cookie lacks a chocolate coating, you could easily dip it in melted chocolate and allow it to set before proceeding with the assembly. This extra step will ensure a similar aesthetic to the traditional pilgrim hat, albeit with a bit more effort.
- Unleashing Your Frosting Imagination: While the convenience of pre-made yellow decorating icing is unparalleled, don’t feel limited! You can effortlessly create your own vibrant yellow frosting by taking a tub of store-bought vanilla frosting and incorporating a few drops of yellow food coloring until you achieve your desired shade. For those who enjoy a more homemade touch, whipping up a batch of classic buttercream frosting allows for complete control over sweetness and texture. Beyond yellow, orange frosting would also be a wonderfully festive choice for these cookies, especially if your holiday theme embraces broader fall aesthetics rather than strictly historical pilgrim hat colors. Experiment with different piping bags and decorative tips to create varied brim textures and patterns, adding unique character to each hat.
- Elevating the Hat Decorations: This is arguably the most exciting stage where your creativity can truly flourish! Moving beyond the simple candy corn buckle, you can introduce a wide array of delightful embellishments. Tiny sprinkles in a harmonious palette of fall colors—think oranges, browns, and yellows—can be delicately scattered around the base of the Reese’s cup or along the hat brim for a playful touch. Miniature chocolate chips can be gently pressed into the soft icing, adding both texture and an extra layer of chocolatey goodness. For a touch of sparkle, edible glitter can be dusted over the hats, making them particularly eye-catching, especially under evening lights. You could even use a fine-tipped black edible marker to draw a small, defined square onto the candy corn buckle, enhancing its resemblance to a traditional metal buckle.
These diverse variations offer virtually endless possibilities for personalization, empowering you to craft a batch of Pilgrim Hat Cookies that are uniquely yours. Each modification will still beautifully retain their inherent festive charm and utterly delicious taste, ensuring a memorable and customized holiday treat.
Step-by-Step Guide: Assembling Your Pilgrim Hat Cookies
Crafting these adorable Pilgrim Hat Cookies is an incredibly straightforward and deeply satisfying process. Even novice decorators will find success with this simple method. Following these clear, easy-to-understand steps will ensure you have a festive platter of charming treats ready to dazzle your guests in very little time. While absolute perfection isn’t the goal—part of their charm is their homemade appeal—a little attention to detail in each stage will undoubtedly help your cookies look their absolute best.
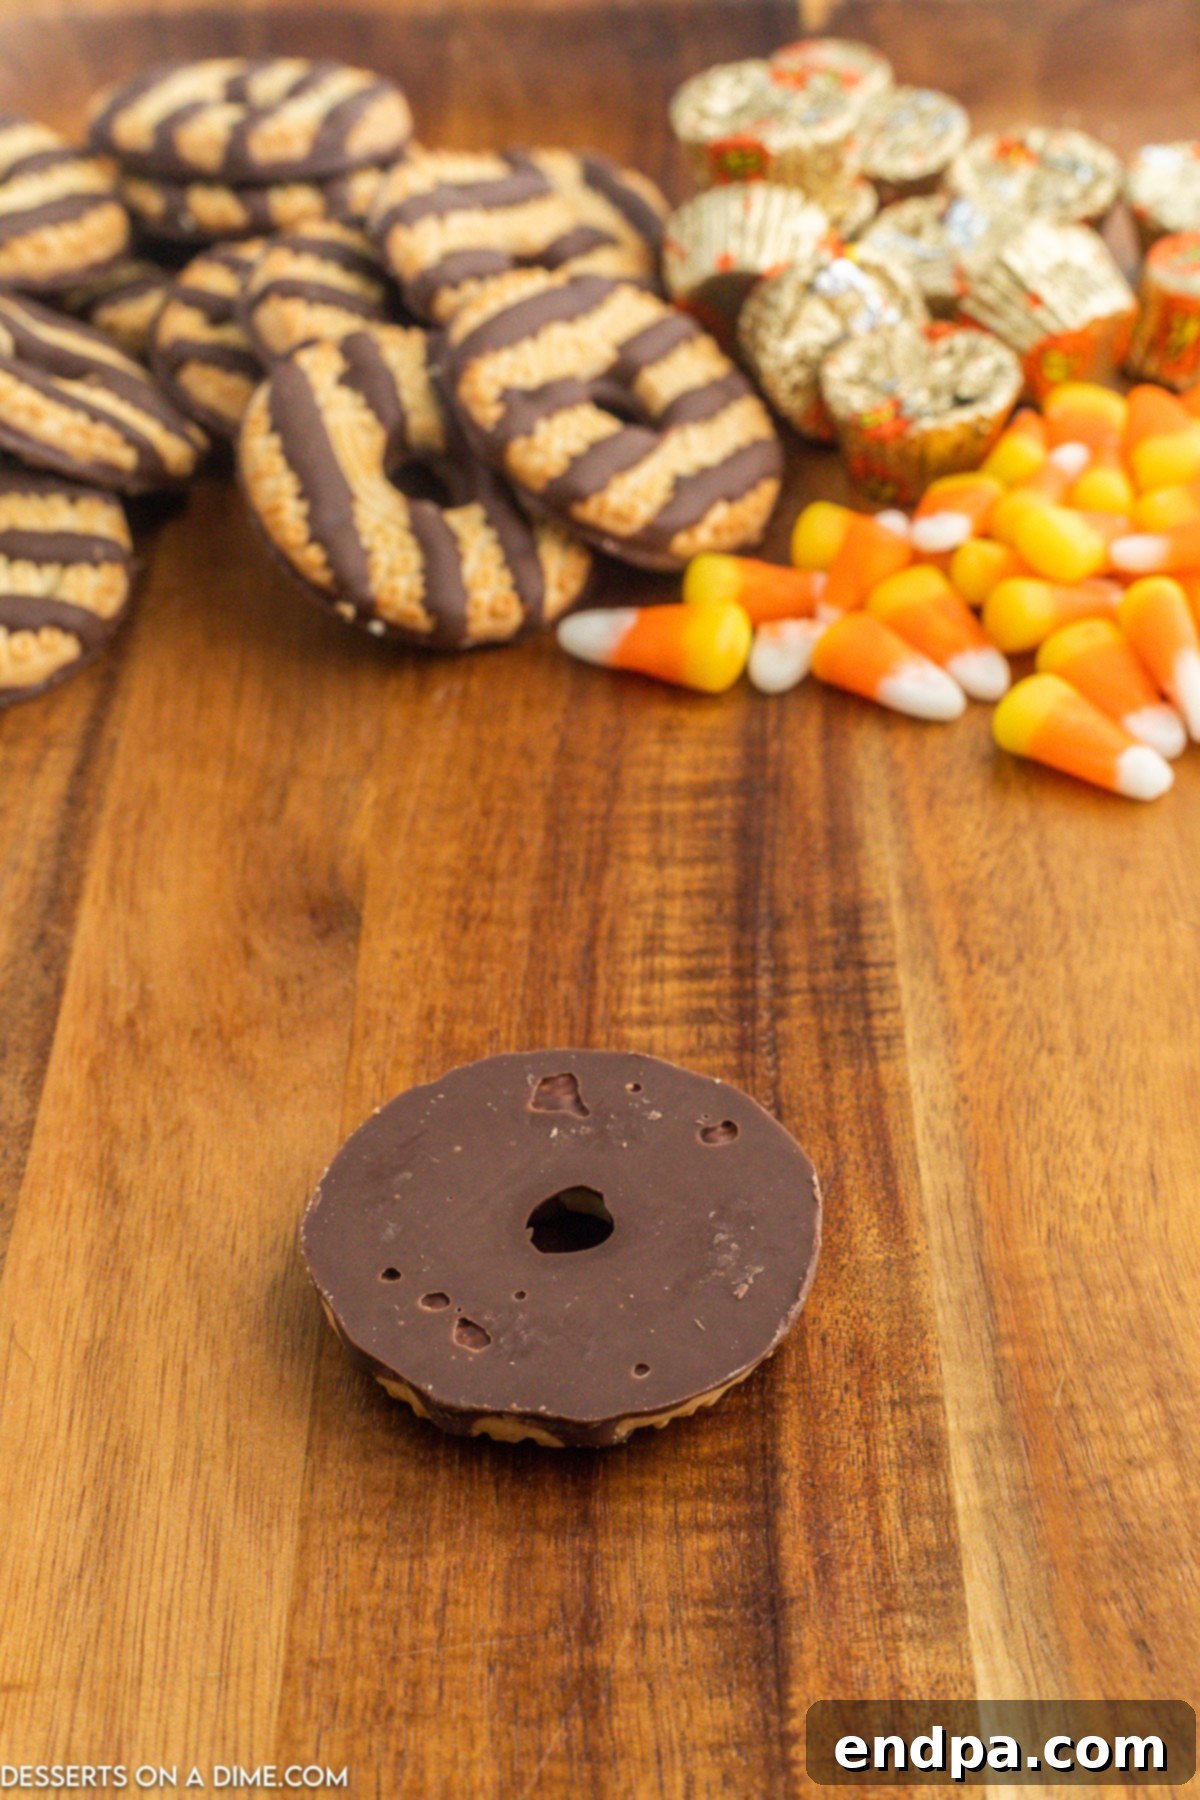
Step 1 – Prepare Your Cookie Base. Begin by carefully taking each Fudge Stripe Cookie and placing it upside down on a clean, stable, and flat work surface. The side that is typically coated in chocolate and usually faces downwards in the package should now be facing upwards. This smooth, chocolate-covered surface will serve as the ideal, stable base for adhering the Reese’s cup and will help in creating the distinct shape of the hat.
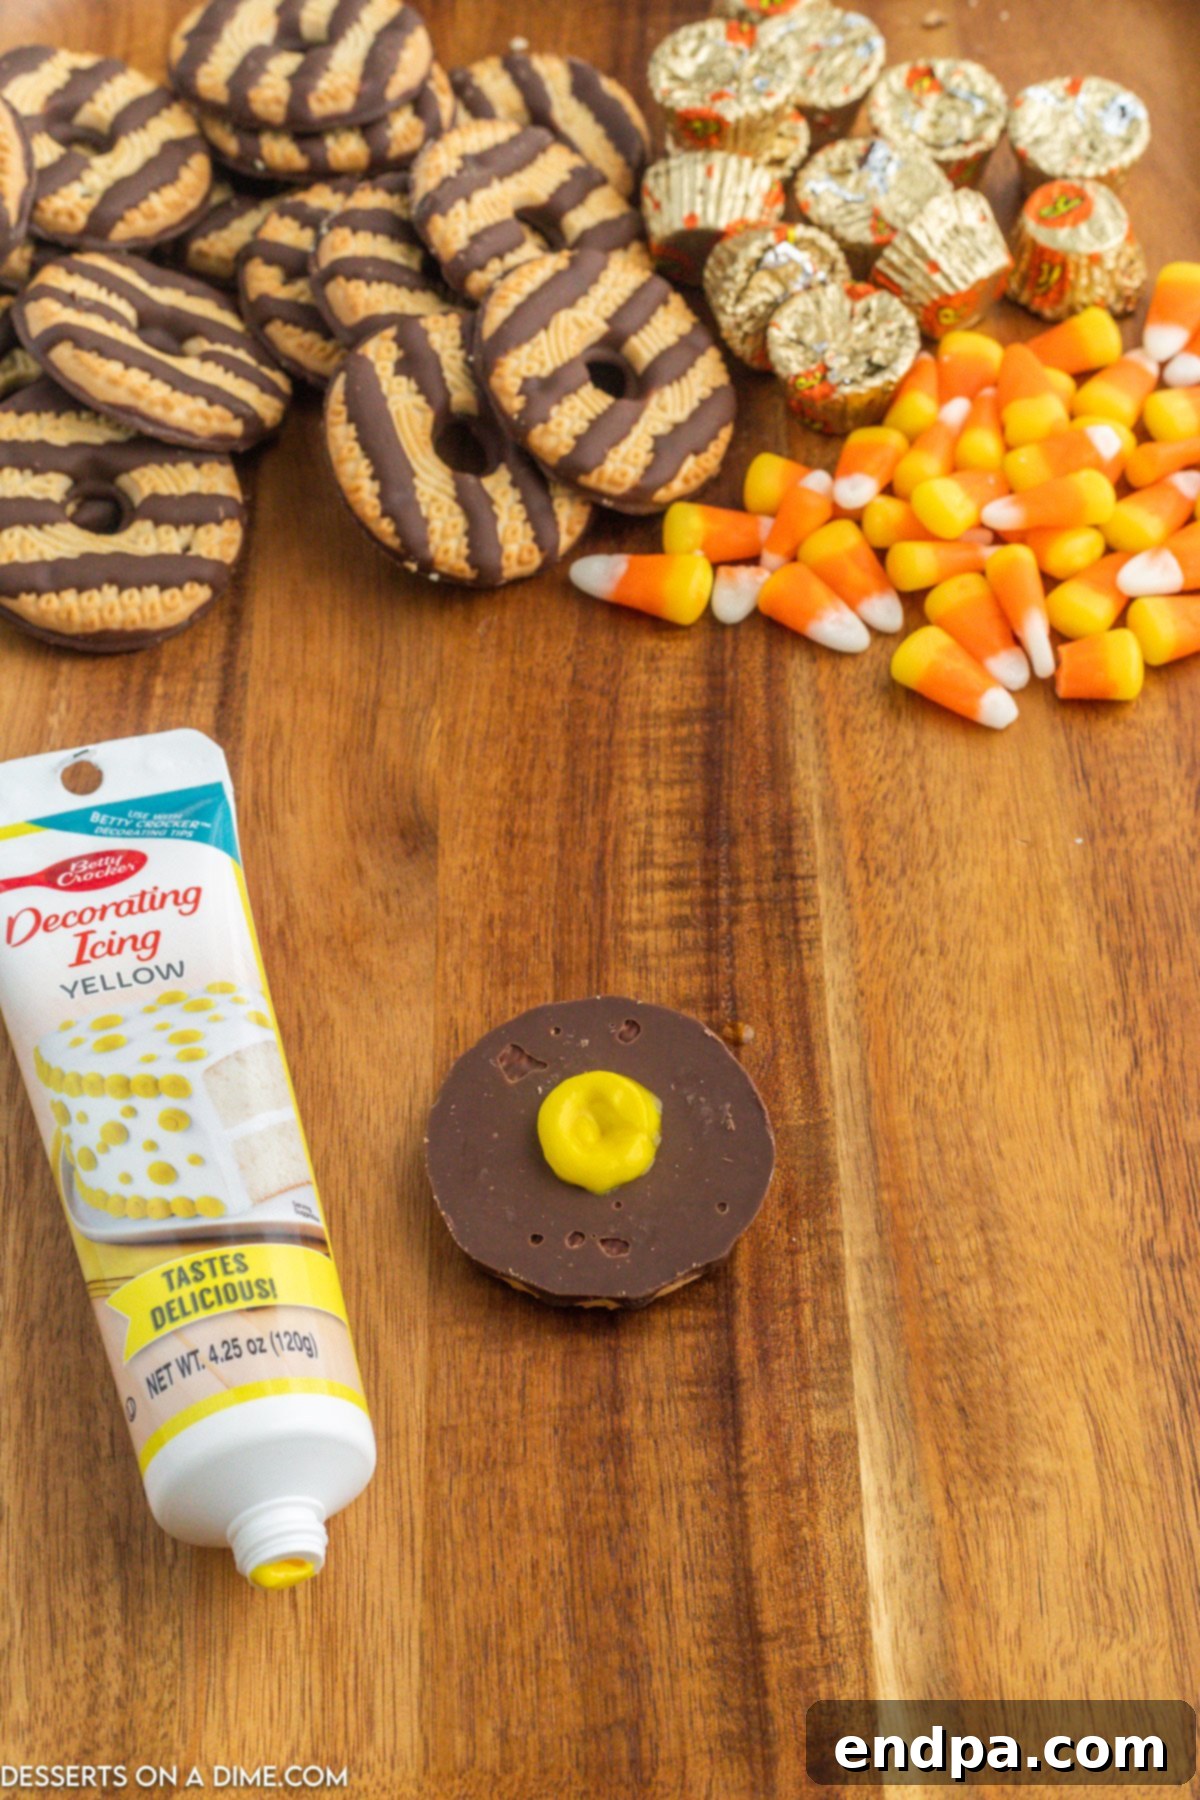
Step 2 – Apply the Icing Adhesive. Take your tube of yellow decorating icing (or your chosen frosting in a piping bag). Carefully and steadily pipe a small, neat circle of icing directly in the absolute center of each upside-down cookie. This circular application of icing will function as the primary “glue” to secure your Reese’s cup and will also contribute to the visually appealing appearance of the hat’s distinct brim.
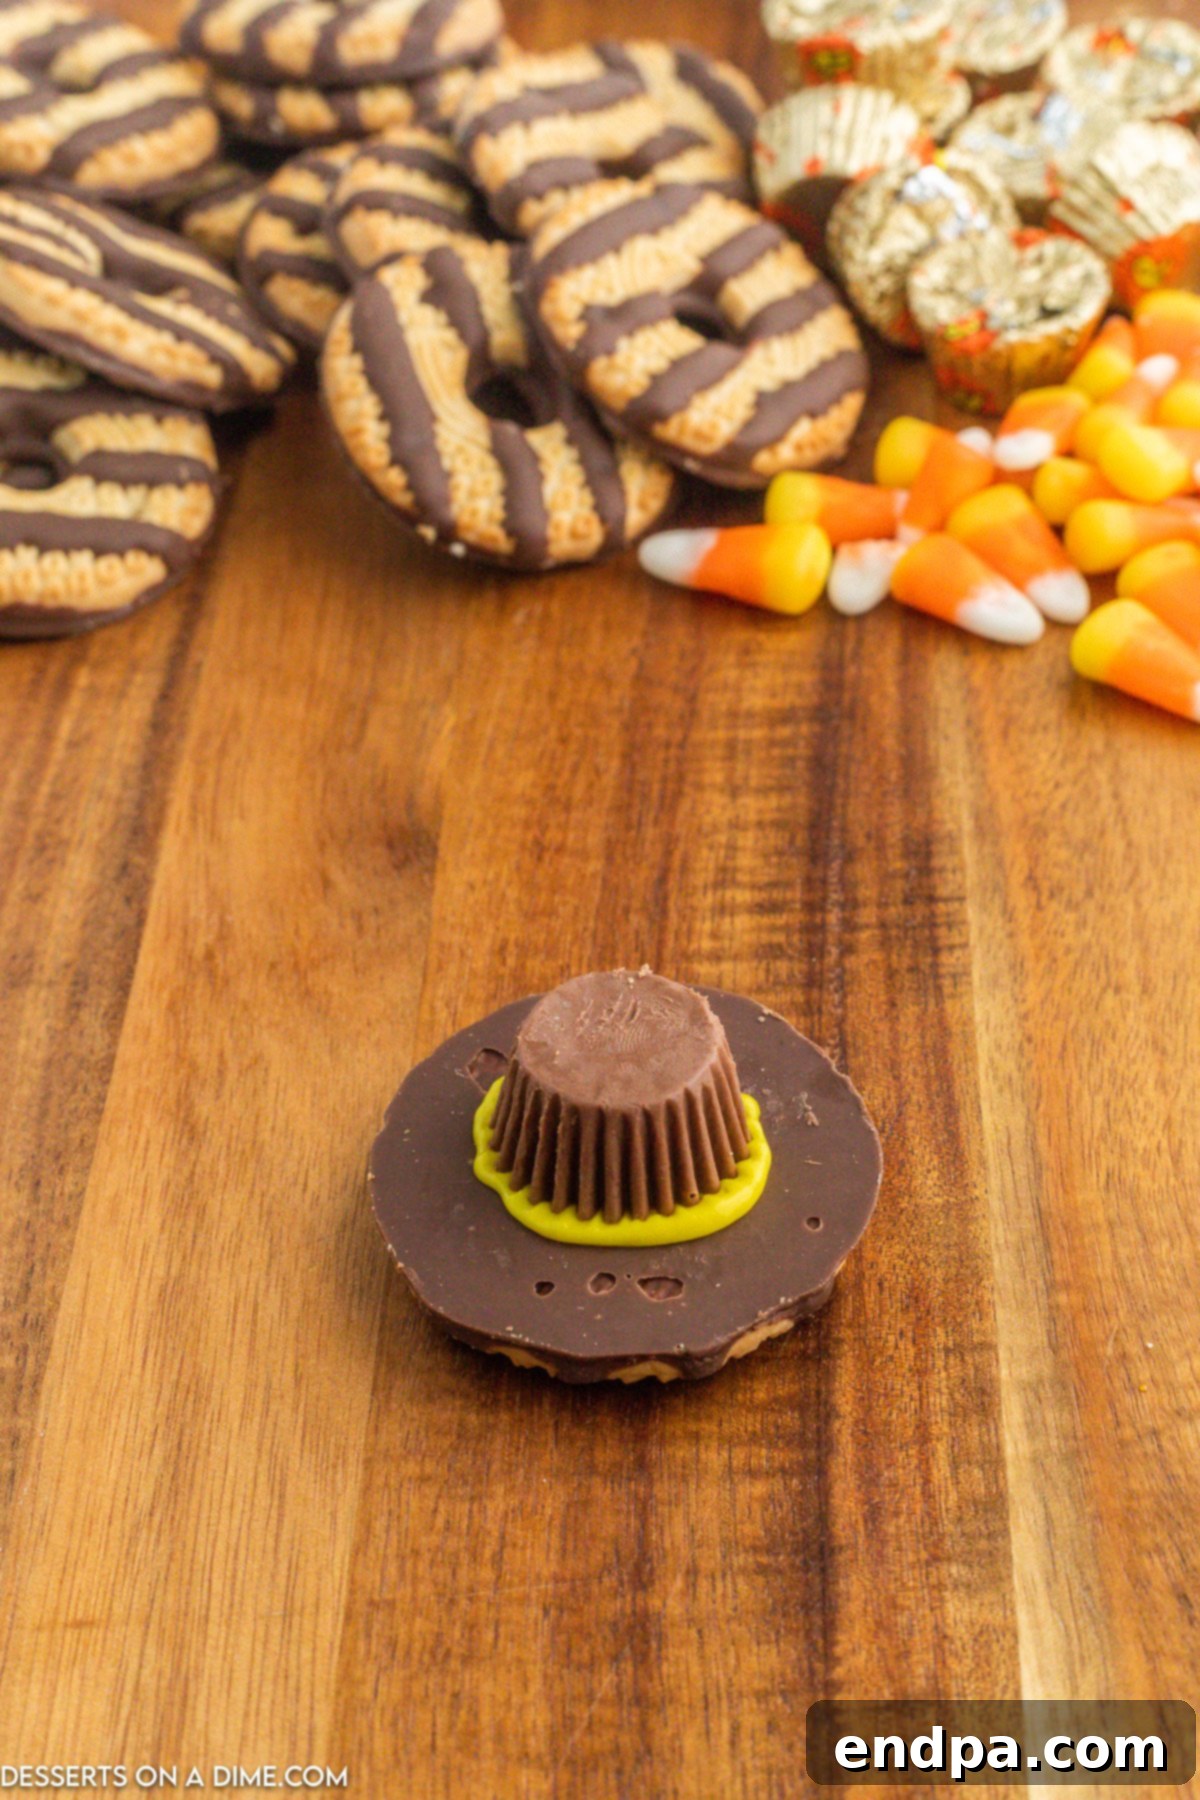
Step 3 – Position the Reese’s Cup. Now, take one of your unwrapped Miniature Reese’s Peanut Butter Cups. Gently but firmly press it upside down directly onto the middle of the icing circle you just piped on the cookie. It is important to ensure it is as centered as possible to achieve a symmetrical and balanced hat appearance. Apply enough pressure so that the Reese’s cup adheres securely to the cookie.
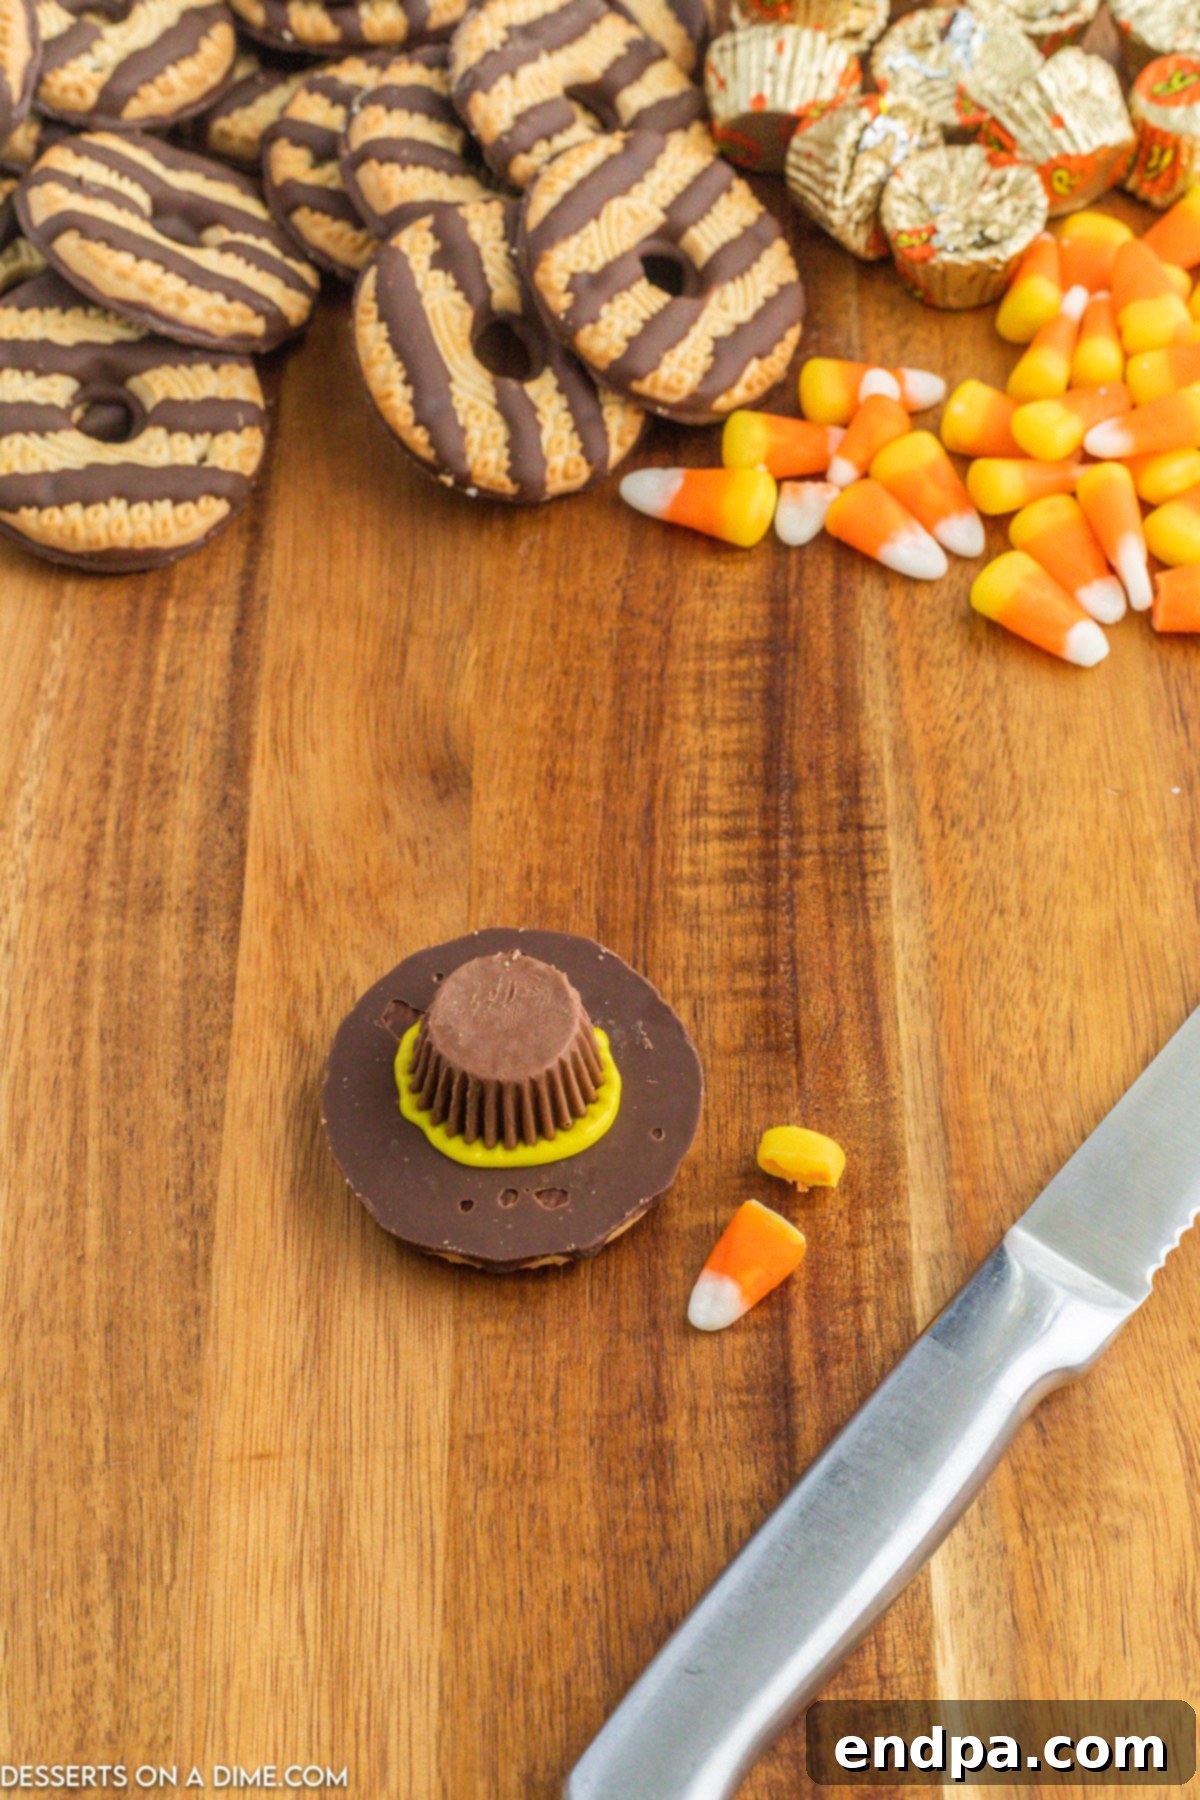
Step 4 – Form the Hat Brim. As you gently press down on the Reese’s cup in the previous step, purposefully allow some of the yellow icing to naturally seep out from underneath its sides. This controlled oozing is key, as it artfully creates the illusion of a distinct, slightly raised hat brim encircling the base of the Reese’s cup. This detail significantly enhances the authentic pilgrim hat aesthetic. Adjust your pressure as needed to achieve a neat and even brim around all sides.
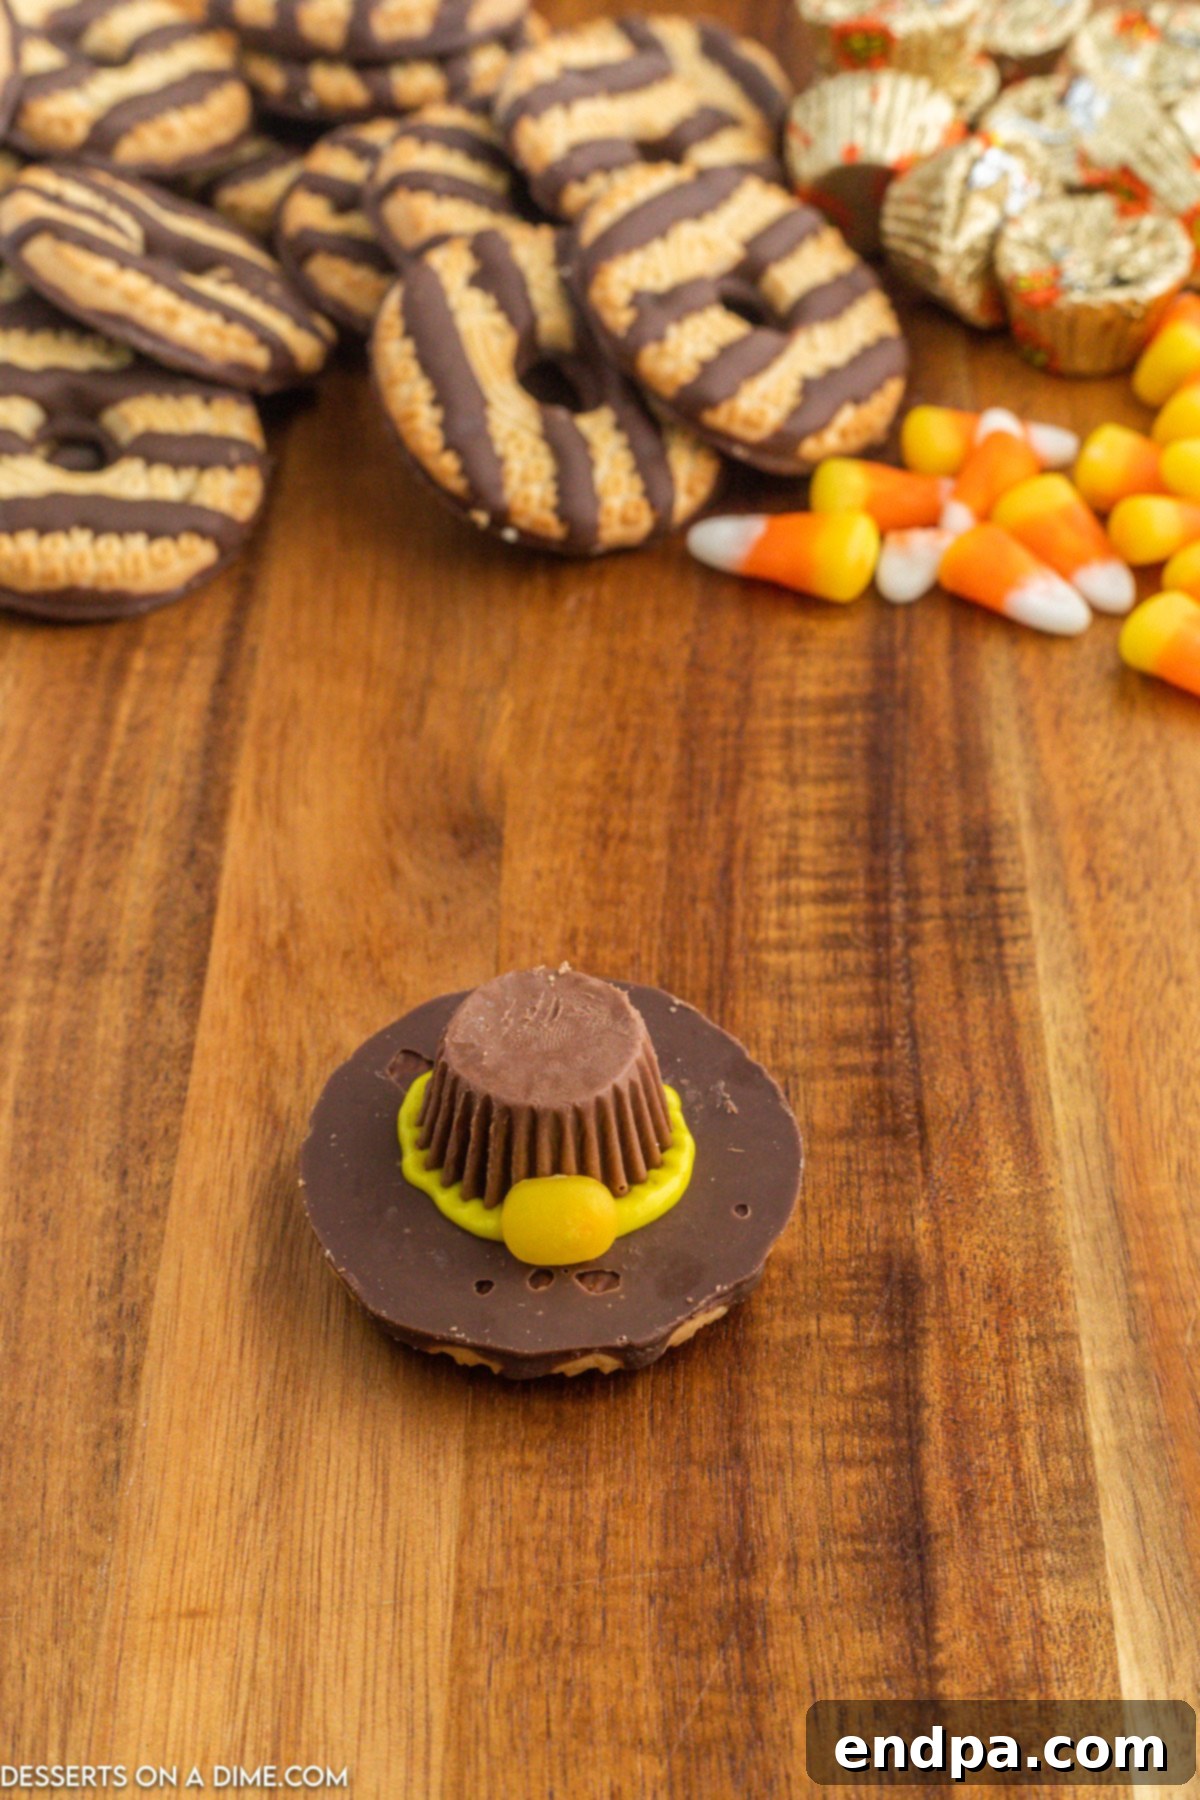
Step 5 – Add the Buckle. Carefully prepare your candy corn. Cut off the distinct orange portion from each piece, aiming for a small, neat trapezoidal or rectangular shape. Gently press this orange piece onto the very front center of the yellow icing brim, positioned just below the Reese’s cup. This piece of candy corn serves as the iconic and highly recognizable buckle on your pilgrim hat, completing its festive transformation. As an alternative, a small peanut butter chip or a yellow M&M can also be used here.
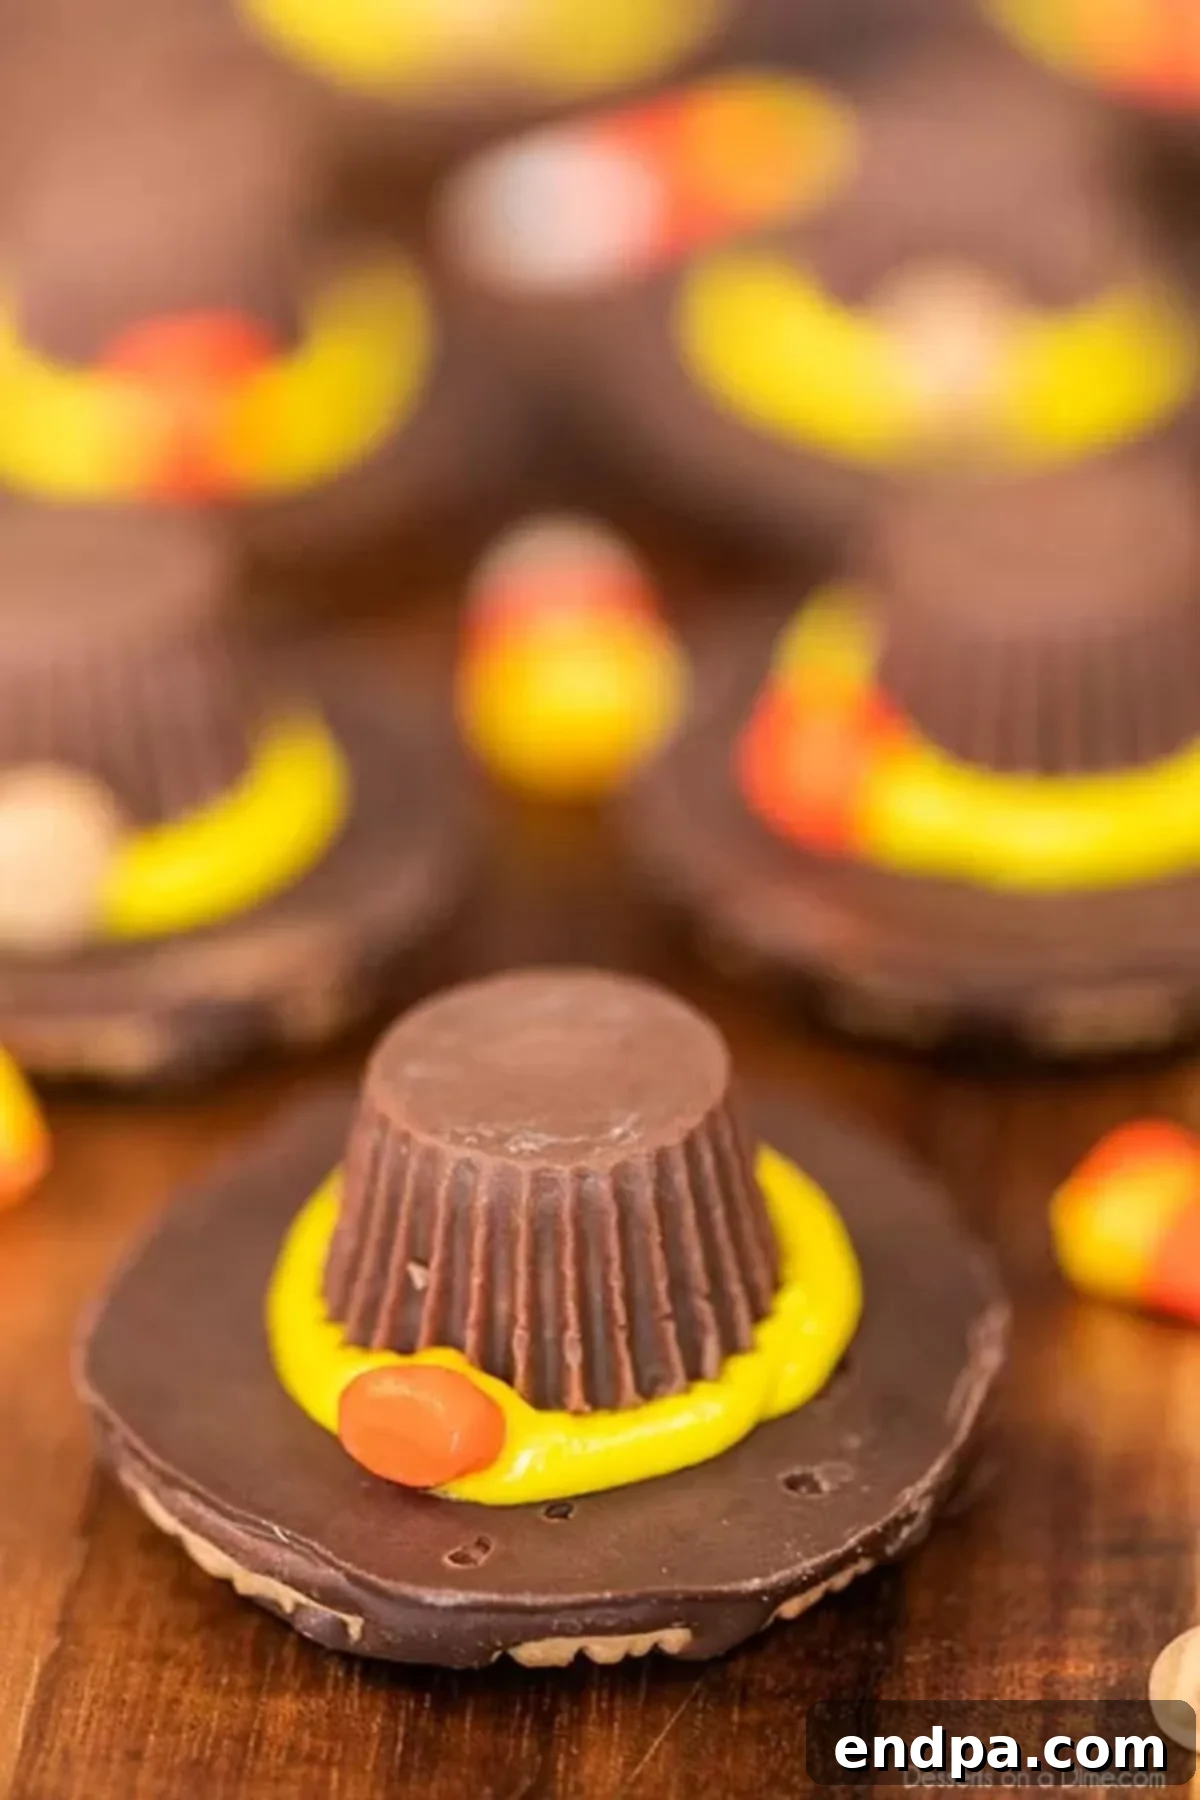
Step 6 – Serve and Enjoy. Once all your Pilgrim Hat Cookies are meticulously assembled, it is highly advisable to allow them a brief period for the icing to set. This typically takes approximately 15 to 30 minutes, especially if you intend to stack or transport them. A set icing ensures the hats remain securely attached and prevents any accidental smudging. After the icing has firmed up, gather your cherished loved ones and proudly present these delicious and wonderfully festive treats. They are unequivocally guaranteed to be a hit and a memorable addition to your holiday spread!
Recipe Video
Watch our quick video tutorial to see just how easy it is to assemble these delightful Pilgrim Hat Cookies in minutes!
Expert Pro Tips for Perfect Pilgrim Hat Cookies
To ensure your Pilgrim Hat Cookies are not only incredibly delicious but also flawlessly crafted and effortlessly managed, consider integrating these expert tips. These insights, drawn from years of experience in creating delightful holiday treats, will help you achieve professional-looking results with minimal effort, making the entire preparation process even more enjoyable and stress-free.
- Mastering the Icing Application: While the convenience of a store-bought tube of decorating icing is highly recommended, for those utilizing a slightly thicker frosting or desiring greater precision, employing a piping bag can be incredibly beneficial. If a professional piping bag isn’t readily available, a simple zip-top bag with a tiny corner carefully snipped off can serve as an effective makeshift alternative. This method allows for a neater, more consistent circle of frosting application, which is crucial for securely attaching the Reese’s cup and creating a clean, defined brim effect. Always ensure your chosen frosting is at room temperature for optimal flow and ease of piping.
- Transforming it into a Family Activity: These cookies are inherently designed for fun, particularly when you involve children in the process. Delegate specific tasks suitable for various age groups: younger children can enthusiastically unwrap the Reese’s cups, older children can assist with piping the icing (under careful supervision), and everyone can participate in the satisfying placement of the candy corn buckles. This collaborative effort not only fosters invaluable teamwork and bonding but also generates cherished holiday memories, making the preparation a joyful and integral part of your Thanksgiving celebration.
- Optimizing Your Work Surface: To facilitate the smoothest possible assembly and to minimize any potential mess, it is always wise to work on a clean, stable, and completely flat surface. A baking sheet generously lined with either parchment paper or wax paper is an ideal choice. This preparatory step serves multiple purposes: it effectively prevents the cookies from sticking to the surface, simplifies cleanup considerably, and most conveniently, allows you to easily transfer the entire batch to a cooler location for setting or chilling without disturbing the individual cookies.
- Embracing Patience: Allowing Frosting to Set: While the temptation to immediately devour these charming treats might be overwhelming, exercising a little patience will yield superior results. We strongly advise allowing the frosting to set completely before you plan to serve, stack, or store the cookies. Depending on the ambient humidity and temperature of your environment, this crucial setting period can range anywhere from a mere 15 minutes to a full hour. A properly set frosting ensures that the “hats” remain securely affixed to their bases and prevents any smudging or accidental mishaps, thereby preserving their pristine and appealing appearance.
- Strategic Planning: Make in Advance & Freezing Techniques: These no-bake marvels are exceptionally well-suited for advance preparation, offering significant relief during the busy holiday period. Once assembled and fully set, arrange them in a single layer within an airtight, freezer-safe container, interspersing sheets of parchment paper between layers to prevent any sticking. They can be safely and effectively stored in the freezer for an impressive duration of up to 3 months. When the time comes to serve, simply transfer them to the refrigerator overnight or allow them to thaw at room temperature for a few hours. This thoughtful advance planning can dramatically reduce your Thanksgiving day stress.
- Proactive Ingredient Preparation: Before embarking on the assembly process, adopt the “mise en place” philosophy by laying out all your ingredients. Crucially, unwrap all the Miniature Reese’s Peanut Butter Cups in advance. If you are cutting candy corn for the buckles, ensure all your orange pieces are prepped and ready to be placed. This organized approach guarantees that the assembly process flows smoothly and efficiently, preventing frantic searching for ingredients mid-creation and allowing you to focus on the enjoyable decorative aspects.
- Minor Adjustments for Dietary Considerations: While the core ingredients of this recipe are quite specific, if you are hosting guests with common dietary restrictions like nut allergies, you might consider thoughtful substitutions. For instance, replacing Reese’s Peanut Butter Cups with solid chocolate kisses or another suitable, nut-free chocolate candy is an option. Similarly, alternative candies can be used for the buckle. Always be diligently mindful of severe allergies and, when necessary, prepare separate, clearly labeled treats to ensure everyone can enjoy safely.
By thoughtfully incorporating these expert pro tips, you will not only create an absolutely delightful and charming batch of Pilgrim Hat Cookies but also guarantee a smooth, efficient, and thoroughly enjoyable experience from the very beginning of preparation to the final, triumphant presentation.
Storage Suggestions for Freshness and Convenience
Proper storage is paramount to maintaining the exquisite freshness and delicious taste of your Pilgrim Hat Cookies, especially if you are planning to prepare them ahead of your Thanksgiving feast. Fortunately, these cookies are quite robust and store remarkably well, positioning them as an outstanding make-ahead option that can significantly ease your holiday workload.
- Room Temperature Storage: For cookies that you intend to enjoy within approximately one week, the ideal storage method is in an airtight container at room temperature. To meticulously prevent them from sticking together and to safeguard the delicate structure of their charming hats, it is highly recommended to place sheets of parchment paper or wax paper between each layer of cookies. Ensure the container is sealed exceptionally tightly to effectively maintain maximum freshness and to prevent any unwanted drying out of the cookies.
- Refrigeration for Extended Freshness: If your home environment is particularly warm or humid, or if you simply prefer a firmer cookie texture, storing them in the refrigerator is an excellent option. Similar to room temperature storage, an airtight container with protective layers of parchment paper between the cookies is advised. When stored correctly in the refrigerator, your Pilgrim Hat Cookies will remain delightfully fresh for up to 10 days, offering great flexibility for your holiday planning.
- Freezing for Long-Term Preservation: As previously highlighted in our expert pro tips, these cookies freeze exceptionally well, making them a fantastic choice for very long-term storage. Once the cookies are fully assembled and the icing has completely set and firmed up, arrange them in a single, even layer on a baking sheet. Flash freeze them for about an hour until they are solid. Following this initial freeze, transfer the now-solid cookies to an airtight, freezer-safe container. Continue to layer them with parchment paper to prevent any sticking or damage. When properly stored in the freezer, these delectable treats will retain their quality for approximately 3 months. To serve after freezing, simply transfer them to the refrigerator overnight or allow them to thaw gently at room temperature for a few hours before indulging.
Embracing the strategy of making these cookies ahead of time can profoundly lighten your holiday workload, granting you the invaluable freedom to concentrate on other critical Thanksgiving preparations while still having a delightful, homemade dessert perfectly ready to present at a moment’s notice.
Frequently Asked Questions About Pilgrim Hat Cookies
To ensure your Pilgrim Hat Cookie creation experience is as smooth and successful as possible, we’ve compiled answers to some common questions. These insights will help address any curiosities you might have about making these festive no-bake treats.
Q: Can I use different types of cookies for the base?
A: Absolutely! While Fudge Stripe Cookies are highly recommended due to their built-in chocolate coating and distinct “brim” design, a variety of other flat, round cookies can serve as suitable alternatives. Popular choices include classic chocolate wafers, simple shortbread cookies, or even circular graham crackers if you desire a slightly different flavor profile and texture. If your chosen cookie isn’t already chocolate-coated, you might consider dipping it in melted chocolate and allowing it to set before proceeding with the assembly. This will help maintain the traditional dark appearance of the hat.
Q: What if I can’t find yellow decorating icing?
A: No need to worry! If yellow decorating icing isn’t available, you have a couple of straightforward options. You can easily create your own yellow icing by taking a tub of store-bought vanilla frosting and mixing in a few drops of yellow food coloring until you achieve the desired vibrant shade. Another excellent alternative is to use melted white chocolate (which can also be tinted yellow with food coloring). Melted white chocolate works wonderfully as an adhesive and will set quite firmly, providing a stable foundation for your hats. You could also experiment with orange or white icing for a slightly different aesthetic.
Q: How far in advance can I make these cookies?
A: These Pilgrim Hat Cookies are an outstanding make-ahead option for your holiday planning! They can be stored in an airtight container at room temperature for up to a week without losing their freshness or charm. For significantly longer storage, they freeze exceptionally well for up to three months. The key for any storage method is to ensure the icing is fully set and firm before you store them, especially if you plan to stack layers with parchment paper in between.
Q: Are these cookies suitable for kids to help make?
A: Yes, absolutely! This is a fantastic and highly recommended recipe for involving children in the kitchen. Since it’s a no-bake recipe, there’s no hot oven involved, making it a safe activity for little ones. Kids can joyfully help with tasks such as unwrapping the Reese’s cups, carefully piping the icing (with a little guidance and supervision), and, of course, placing the iconic candy corn buckles. It’s an engaging, hands-on activity that helps create wonderful, lasting holiday memories for the whole family.
Q: What are some other ideas for the hat buckle if I don’t like candy corn?
A: There are numerous creative and delicious alternatives for the hat buckle if candy corn isn’t to your taste! Small peanut butter chips, miniature M&M’s (yellow or orange colors work particularly well), a small, precisely cut square of dark chocolate, or even a tiny dot of black decorating gel can effectively mimic the traditional buckle. You could also consider a small piece of black licorice or a tiny chocolate button for a different textural and visual appeal.
Q: How should I best serve these cookies?
A: Pilgrim Hat Cookies look absolutely wonderful when elegantly arranged on a festive platter. They can be served as a delightful addition alongside your other Thanksgiving desserts, used as charming edible decorations to enhance your table setting, or even packaged individually as thoughtful party favors for your guests. For the best flavor and texture, they are most enjoyable when served at room temperature.
Pin Recipe for Later
Print Recipe
Pilgrim Hat Cookies
Surprise the kids and impress your guests with these adorable Pilgrim Hat Cookies at Thanksgiving. This easy no-bake treat requires only 4 simple ingredients!
10 minutes
10 minutes
24 servings
American
Dessert
116
Carrie Barnard
Ingredients
- 24 Fudge Stripe Cookies
- 24 Miniature Reese’s Peanut Butter Cups, unwrapped
- 24 Pieces Candy Corn (for the orange portion of each)
- 4 oz Yellow Decorating Icing (store-bought tube recommended)
Instructions
- Place the Fudge Stripe Cookies upside down on a flat work surface so that the chocolate-coated part is facing up. This creates a stable and visually appealing base for your hats.
- Using the store-bought yellow decorating icing, carefully pipe a small, neat circle of icing around the center of each cookie. This circle will serve as both the adhesive for the Reese’s cup and the visible brim of the hat.
- Gently press one unwrapped Miniature Reese’s Peanut Butter Cup upside down onto the middle of the icing circle on each cookie. Allow the icing to naturally seep out from the sides of the peanut butter cups; this creates the distinct, raised appearance of a hat brim.
- Carefully cut off the orange portion from each piece of candy corn (you can also use a small peanut butter chip or yellow M&M). Press this orange piece onto the very front center of the yellow icing brim, just below the Reese’s cup, to create the iconic buckle on the hat.
- Allow the icing to set for about 15-30 minutes before serving. Then, proudly serve and enjoy these charming and delicious Pilgrim Hat Cookies!
Recipe Notes
Feel free to experiment with any color icing you prefer, or even make your own homemade frosting. For an alternative buckle, M&M’s (yellow or orange) or small red hots can be used instead of candy corn, offering more creative freedom and catering to different tastes.
Nutrition Facts
Calories: 116 kcal, Carbohydrates: 16g, Protein: 1g, Fat: 5g, Saturated Fat: 2g, Cholesterol: 1mg, Sodium: 92mg, Potassium: 51mg, Fiber: 1g, Sugar: 12g, Vitamin A: 4IU, Calcium: 8mg, Iron: 1mg
Love this recipe? Pin It Now to Remember It Later for your next Thanksgiving gathering!
Pin This Recipe!
More Festive Thanksgiving Treats You’ll Love
Thanksgiving Desserts
Thanksgiving Sugar Cookies Recipe
Thanksgiving Desserts
Thanksgiving Cake Pops Recipe
Cookies
Oreo Turkey Cookies
No Bake Dessert
