Indulge in the luxurious simplicity of homemade Chocolate Covered Strawberries, a dessert that instantly elevates any occasion. This guide provides you with the definitive tips, tricks, and step-by-step instructions to effortlessly create these elegant treats in your own kitchen. Forget the inflated bakery prices; crafting your own chocolate-dipped strawberries is surprisingly easy, incredibly rewarding, and yields results that are just as stunning, if not more so, for a mere fraction of the cost.

Chocolate Covered Strawberries possess an undeniable allure, a perfect marriage of fresh, juicy fruit and rich, velvety chocolate. They epitomize sophistication and romance, making them a perennial favorite for Valentine’s Day, Mother’s Day, anniversaries, or simply as a special everyday indulgence. The beautiful contrast of vibrant red berries against glossy dark or white chocolate is visually captivating, always leaving a lasting impression on guests and loved ones alike. While bakeries often charge exorbitant prices for these decadent delights, discovering how truly simple they are to prepare at home means you never have to overspend again. Our detailed instructions ensure you achieve professional-looking results with minimal effort, allowing you to customize your creations with various toppings or appreciate their elegant simplicity.
Table of Contents
- Why This Recipe Is A Must-Try
- Essential Ingredients for Perfect Chocolate Covered Strawberries
- How to Master Chocolate Covered Strawberries: Step-by-Step
- Creative Topping and Decoration Ideas
- Expert Pro Tips for Flawless Results
- Frequently Asked Questions
- Storage Best Practices
- More Irresistible Strawberry Desserts
- Explore More Decadent Chocolate Treats
Why This Recipe Is A Must-Try
This recipe for chocolate-covered strawberries is a true game-changer, making an impressive dessert accessible to everyone. Each bite-sized treat offers a delightful blend of fresh fruitiness and rich chocolate, creating an experience that is both refreshing and utterly satisfying. Beyond their incredible taste, these treats are remarkably budget-friendly to make at home, especially when compared to store-bought versions. The versatility in decoration is limitless, allowing you to unleash your creativity and tailor them for any event or preference.
Crafted with just a few simple ingredients, this no-bake dessert is a guaranteed crowd-pleaser for any gathering, from intimate dinners to large celebrations. If you love the combination of ease and elegance, you might also enjoy making Dark Chocolate Covered Almonds for a sophisticated snack or Chocolate Turtles for another classic confection that never disappoints.
Essential Ingredients for Perfect Chocolate Covered Strawberries
Creating exceptional chocolate-covered strawberries begins with selecting the right ingredients. The beauty of this recipe lies in its simplicity, requiring only a handful of items to achieve gourmet results. Here’s what you’ll need:
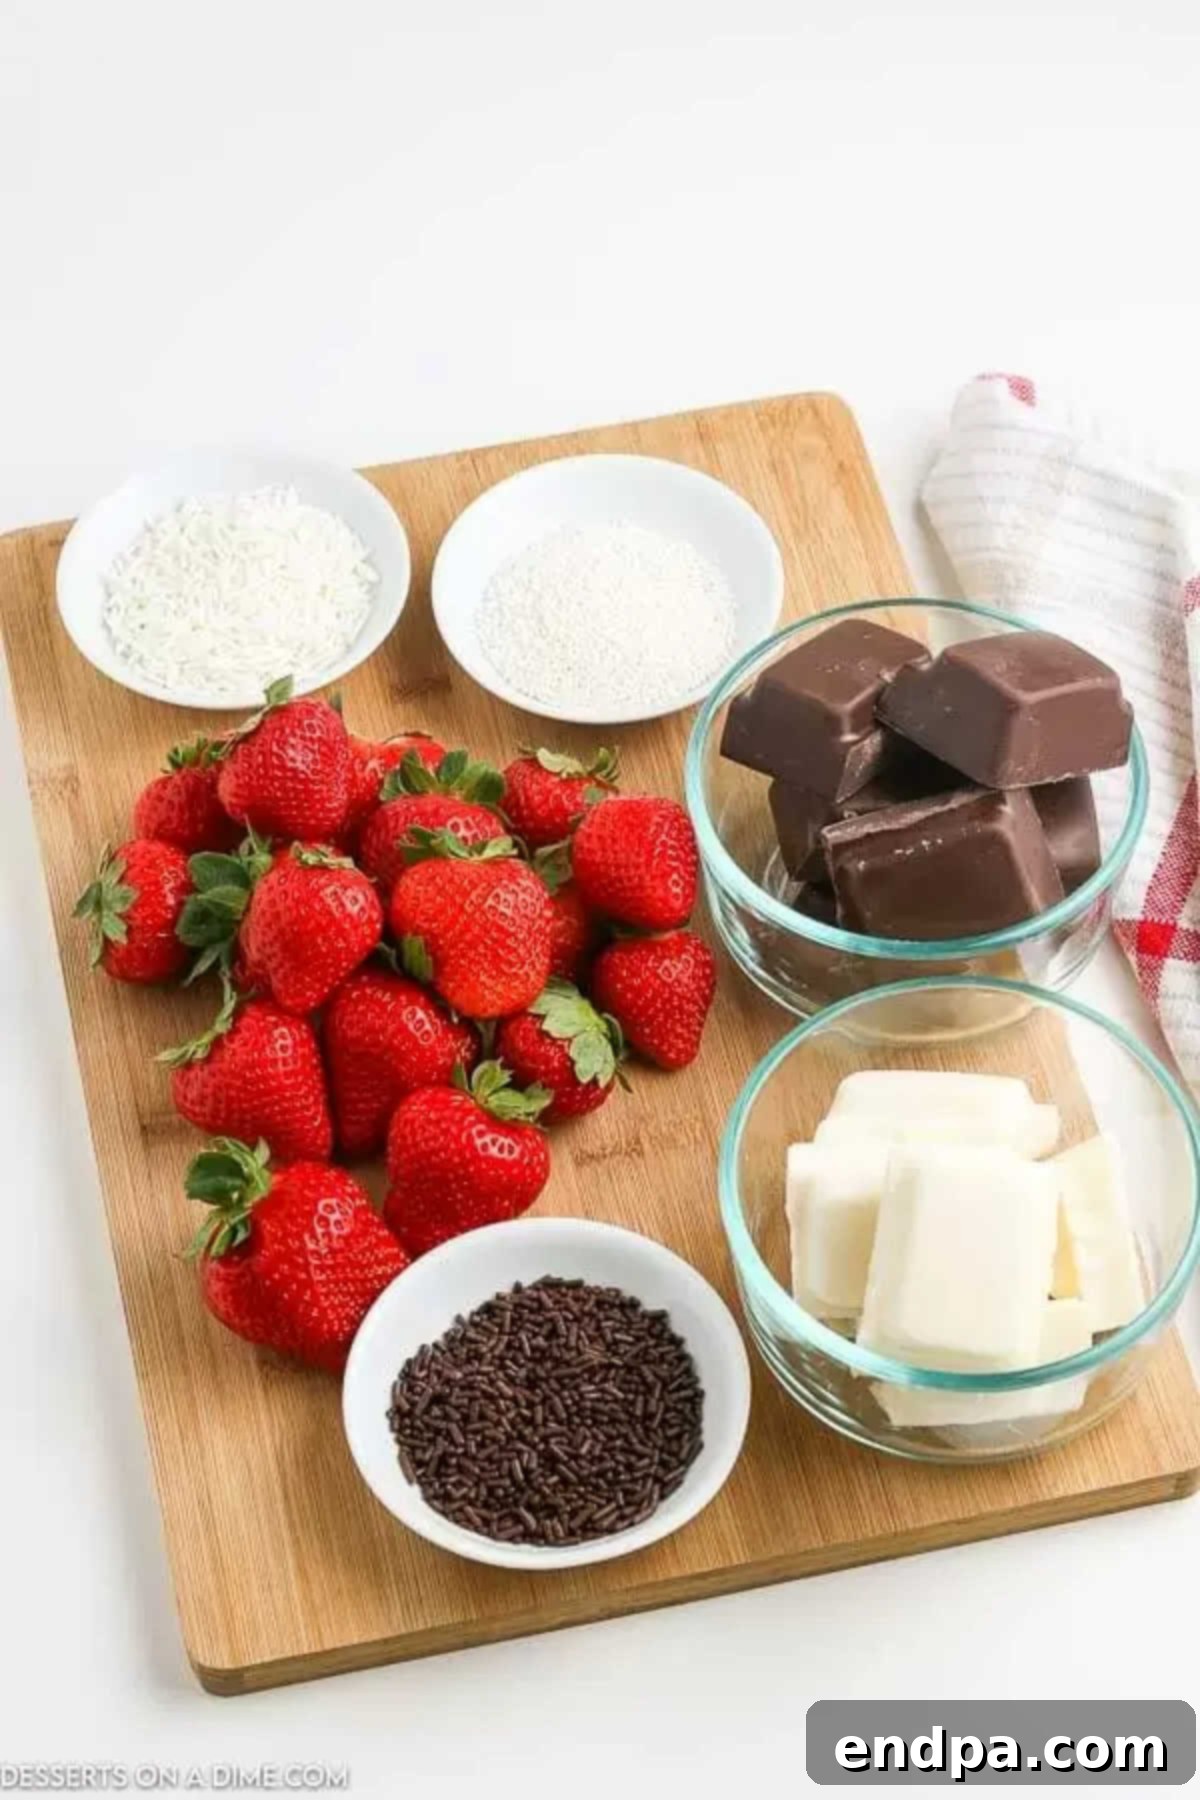
- Strawberries: The star of the show! Always choose fresh, ripe, and firm strawberries with vibrant red color. Make sure to clean them thoroughly under cool running water and, most importantly, dry them completely. Any moisture on the berries will prevent the chocolate from adhering properly, resulting in a less than perfect finish.
- Chocolate Almond Bark (and White Chocolate Almond Bark): We highly recommend using almond bark for its superior melting qualities. Unlike regular chocolate chips, almond bark contains vegetable fats that allow it to melt smoothly and evenly without seizing or requiring tempering. This makes it incredibly easy to work with, giving your strawberries a beautiful, glossy, and firm coating. You can use dark, milk, or white chocolate almond bark, or a combination of both for stunning visual contrast. For a truly decadent experience, consider using high-quality melting wafers or chocolate designed for dipping if you prefer a richer chocolate flavor.
- Chocolate Sprinkles and White Sprinkles: These are fantastic for adding a pop of color, texture, and festive flair. Sprinkles adhere best when the chocolate is still wet, so have them ready for immediate application. Don’t limit yourself to just chocolate and white; any color or type of sprinkle can be used to match your theme or mood.
You can find the complete, detailed list of ingredients and precise measurements in the recipe card at the bottom of the page, ensuring you have everything prepared for a seamless dessert-making experience.
How to Master Chocolate Covered Strawberries: Step-by-Step
Making homemade chocolate-covered strawberries is simpler than you might think. Follow these easy steps to create a show-stopping dessert that tastes as good as it looks.
- Step 1 – Prepare Your Workspace: First, ensure you have a clean and organized work area. Line a baking sheet with parchment paper or a silicone mat. This non-stick surface is crucial for preventing the dipped strawberries from sticking as the chocolate sets.
- Step 2 – Gather Your Toppings: Next, prepare all of your desired toppings. If you’re using sprinkles, chopped nuts, or other decorative elements, place them in small, shallow bowls or cups. Having everything organized and within reach will make the dipping process quick and mess-free, as toppings need to be applied immediately after dipping.
- Step 3 – Perfect Your Strawberries: Clean your strawberries thoroughly under cold water and then pat them completely dry with paper towels. This step is absolutely critical. Even a tiny bit of moisture on the berries can cause the chocolate to seize or refuse to adhere smoothly. After patting them dry, allow them to air dry on a paper towel for another 10-15 minutes at room temperature to ensure every last drop of moisture has evaporated. Room temperature strawberries also help the chocolate adhere better and set more evenly.
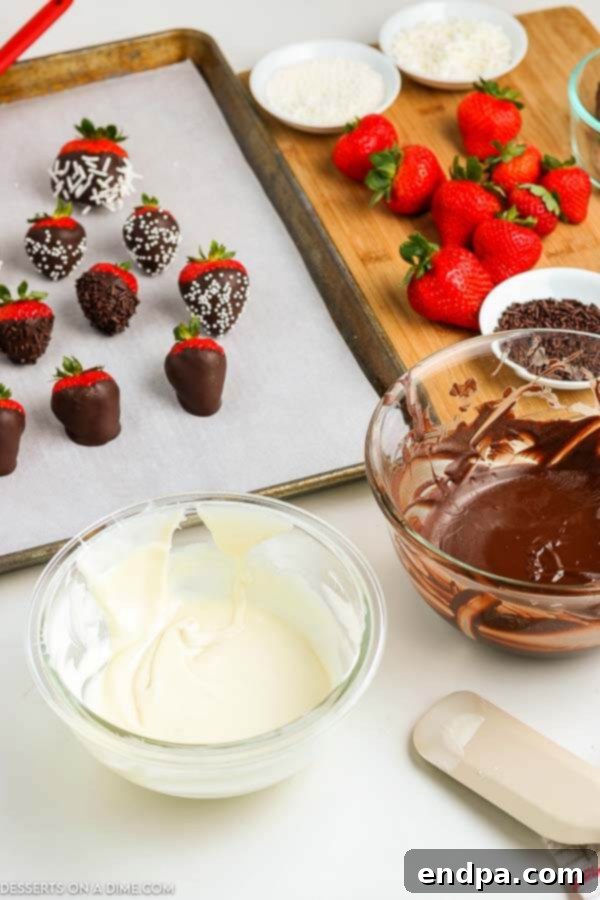
Step 4. Melt the Chocolate: Place your almond bark (or chosen melting chocolate) in a microwave-safe bowl. Begin by microwaving for 1 minute, then stir thoroughly. Continue heating in 20-30 second intervals, stirring well after each interval, until the chocolate is smooth and fully melted. It’s important to stir frequently to prevent burning and ensure even melting. Alternatively, you can use a double boiler on the stovetop for a more controlled melting process, stirring constantly until smooth. Use whichever method you feel most comfortable with to achieve perfectly melted chocolate.
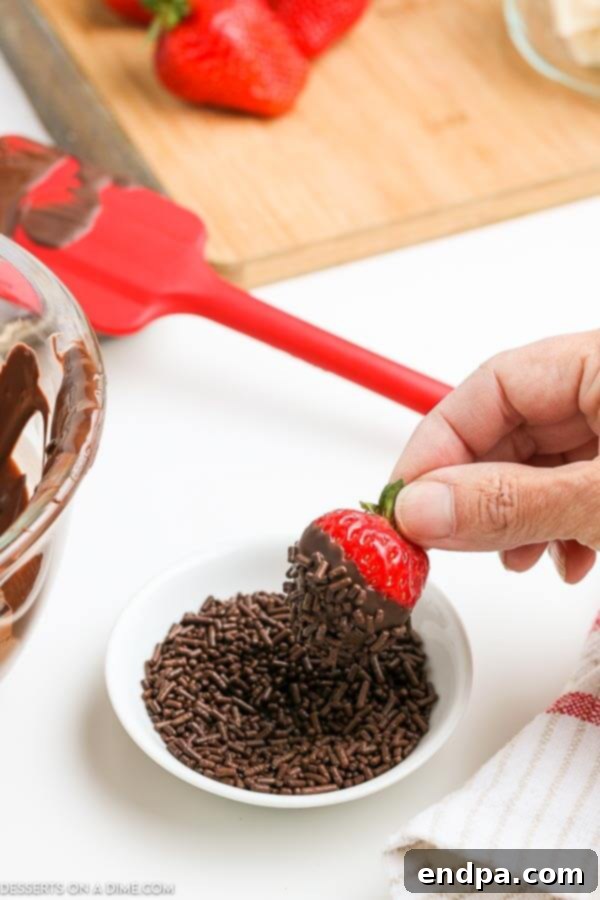
Step 5. Dip and Decorate: Holding a strawberry by its stem or green leaves, dip it into the melted chocolate, rotating gently to coat most of the berry, leaving a small portion of the top visible for a professional look. Allow any excess chocolate to drip off back into the bowl. Immediately after dipping, if you’re adding sprinkles or other toppings, gently roll or dip the chocolate-covered strawberry into your prepared topping. This ensures the toppings adhere perfectly before the chocolate begins to set. Place the finished strawberry onto your parchment-lined baking sheet.
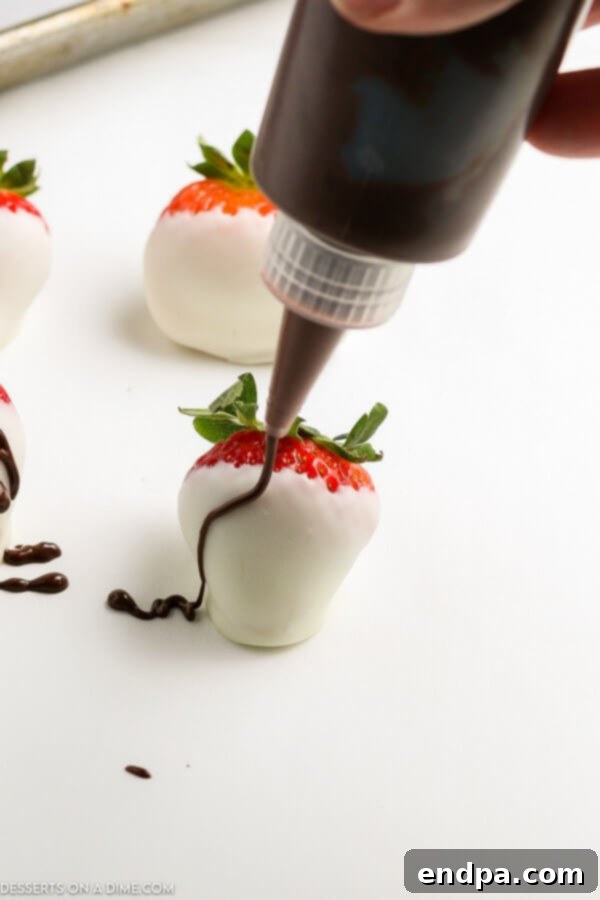
- Step 6. Drizzle for Extra Flair: For an elegant drizzle, melt a small amount of additional almond bark (white or contrasting color works best) in the microwave. Transfer the melted chocolate into a plastic squeeze bottle or a piping bag with a very small tip. Drizzle the chocolate in zig-zag patterns over your dipped strawberries. This adds another layer of visual appeal and flavor. Once all strawberries are dipped and decorated, allow them to set on the parchment-lined baking sheet for about 30 minutes at room temperature, or in the refrigerator for 10-15 minutes, until the chocolate is completely firm.
Creative Topping and Decoration Ideas
One of the most enjoyable aspects of making chocolate-covered strawberries is the endless possibilities for customization and decoration. Elevate your treats with these fun and easy topping ideas, perfect for any occasion:
- Chopped Nuts: Add a sophisticated crunch with finely chopped pecans, pistachios, walnuts, or almonds. Toasting the nuts lightly beforehand can enhance their flavor.
- Shredded Coconut: For a tropical twist, roll your dipped strawberries in shredded coconut, either sweetened or unsweetened. Toasted coconut adds a lovely golden color and deeper flavor.
- Mini Chocolate Chips: A classic choice, mini chocolate chips (milk, dark, or white) offer an extra boost of chocolatey goodness and a delightful texture.
- Sprinkles: Beyond the basic chocolate and white, explore a rainbow of colored sprinkles, nonpareils, or sanding sugars to match holiday themes (red and green for Christmas, pastels for Easter) or party decorations.
- Crushed Graham Cracker Crumbs: For a s’mores-inspired treat, dip strawberries in chocolate and then in crushed graham crackers.
- Crushed Candy: During the holidays, crushed candy canes add a festive minty flavor and beautiful red and white flecks. Other crushed candies like butterscotch chips or toffee bits also make excellent toppings.
- Melted White Chocolate Drizzle: A contrasting chocolate drizzle is a simple yet elegant way to decorate. After dipping in dark or milk chocolate, drizzle with melted white chocolate for a striking visual effect. For superior quality and melting, we often use Ghirardelli melting wafers for drizzling.
- Powdered Sugar or Cocoa Powder: For a subtle and elegant finish, lightly dust cooled strawberries with powdered sugar or cocoa powder, creating a delicate veil of sweetness or bitterness.
Expert Pro Tips for Flawless Results
Achieving perfect chocolate-covered strawberries every time is easy with a few expert tips:
- Almond Bark for Coating: Almond bark is your best friend for smooth, easy melting and a firm, glossy coating that sets beautifully without tempering. As a general guide, 3-4 squares of almond bark should be sufficient to coat 10-12 medium-sized strawberries. Adjust the quantity based on the number and size of your berries.
- Strawberry Selection and Preparation: Always select the freshest, ripest, and firmest strawberries you can find. Look for berries with vibrant color and healthy green caps. Before dipping, it is paramount to wash and dry your strawberries completely. Any residual moisture will cause the chocolate to seize, creating a lumpy, unattractive coating that won’t stick. Allow them to come to room temperature before dipping; cold strawberries can cause the chocolate to set too quickly, leading to cracks or a thick, uneven coat.
- Mastering Chocolate Melting: Whether you use a microwave or a double boiler, avoid overheating the chocolate. Over-melted chocolate can burn, develop a grainy texture, or become too thick to work with, ruining the flavor and appearance. Heat in short intervals, stirring frequently, and remove from heat just as a few small lumps remain, allowing residual heat to complete the melting process as you stir.
- Double Boiler Method: If you’re nervous about microwaving, a double boiler provides a gentler, more controlled heat for melting chocolate. Place a heat-proof bowl over a saucepan with simmering water, ensuring the bottom of the bowl does not touch the water. Stir the chocolate continuously until smooth and melted.
- Maintain Chocolate Temperature: If your chocolate starts to cool and thicken while dipping, return it to the microwave for a very short interval (10-15 seconds) or back over the double boiler for a moment, stirring until it reaches the desired consistency again.
- Handle with Care: Hold strawberries by their green tops or stems when dipping and placing them on the parchment paper. This minimizes contact with the chocolate and helps maintain a clean finish.
Frequently Asked Questions
For smooth, perfectly melted chocolate, place your almond bark or melting wafers in a microwave-safe bowl. Start by heating it for 1 minute on medium power. Remove the bowl and stir the chocolate thoroughly, even if it doesn’t look fully melted. Then, continue heating in 20-30 second intervals, stirring well after each one. The key is to stop just before the chocolate is completely melted, when a few small lumps remain. The residual heat from the bowl and the already melted chocolate will finish the job as you continue to stir, resulting in a perfectly smooth, glossy consistency. This technique prevents burning and ensures a beautiful finish. Alternatively, a double boiler offers gentle, indirect heat, ideal for preventing scorching. Place a heatproof bowl over a saucepan of simmering water (ensure the bowl doesn’t touch the water) and stir continuously until smooth.
Chocolate-covered strawberries are best enjoyed fresh, ideally within 24-48 hours of making them. While they can last for several days, the strawberries will start to soften and release moisture over time, which can affect the chocolate coating and the overall texture. The peak freshness and flavor are experienced within the first day or two. To maximize their shelf life, store them in a single layer in an airtight container in the refrigerator. If you need to stack them, place a layer of parchment paper between the layers to prevent sticking and transfer of moisture. Bringing them to room temperature for 15-20 minutes before serving can enhance their flavor and texture, but avoid leaving them out for too long.
Decorating chocolate-covered strawberries is where you can truly let your creativity shine! Beyond simply dipping, consider drizzling contrasting melted chocolate (white, milk, or dark) over the top for elegant stripes or whimsical zig-zags. You can also roll the wet chocolate coating in various toppings like finely chopped nuts (pecans, pistachios, almonds), shredded coconut (toasted or plain), mini chocolate chips, or colorful sprinkles to match any theme. For a sophisticated touch, a light dusting of cocoa powder or edible glitter can also create a stunning effect. Don’t be afraid to experiment with different combinations to find your favorite!
Selecting high-quality strawberries is fundamental to the success of this dessert. Look for berries that are bright red, plump, and firm, indicating peak ripeness and flavor. Avoid any strawberries that appear bruised, mushy, or have mold, as these will not hold up well to dipping and will quickly spoil the batch. Larger strawberries are generally easier to handle and dip into melted chocolate, offering a more satisfying bite. Ensure the green caps are intact and fresh-looking, as this is another sign of a healthy berry. A sweet aroma is also a good indicator of flavorful fruit.
Absolutely not! Frozen strawberries are not suitable for making chocolate-covered strawberries. When frozen strawberries thaw, they release a significant amount of water, becoming soft and mushy. This excess moisture will prevent the chocolate from adhering properly, causing it to slide off or create a watery mess. Furthermore, the texture of a thawed strawberry is far too soft and unappealing for dipping. Always use fresh, firm, and thoroughly dried strawberries for the best results.
Proper washing and, more critically, drying of your strawberries is the single most important step for successful chocolate-covered strawberries. Begin by gently rinsing the berries under cool running water while they are still attached to their green caps. Avoid soaking them, as this can make them waterlogged. After rinsing, place the strawberries on a layer of clean paper towels and pat them very gently until they appear dry. Then, transfer them to a fresh, dry paper towel or a wire rack and allow them to air dry completely for at least 15-30 minutes, or even longer, depending on humidity. This ensures that every trace of moisture has evaporated, providing a perfect, dry surface for the chocolate to cling to without seizing or slipping off. Be patient with this step; it’s worth the wait for flawless results.
Chocolate seizing refers to it suddenly turning thick, lumpy, and unusable. This typically happens when even a tiny amount of water or steam comes into contact with melted chocolate. Moisture causes the cocoa solids to clump together, separating from the fat. To prevent seizing, ensure all your utensils and bowls are completely dry. When using a double boiler, make sure the water in the saucepan is simmering gently, not boiling vigorously, and that the bowl containing the chocolate does not touch the water. Also, be careful that no steam escapes from the saucepan and condenses into the chocolate. If your chocolate does seize, sometimes you can rescue it by stirring in a teaspoon of vegetable oil or melted shortening, but it may not regain its original smooth texture.
Dipping cold strawberries directly from the refrigerator into warm melted chocolate can cause several issues. The sudden temperature change can lead to condensation forming on the cold berry, which, as discussed, can cause the chocolate to seize. Additionally, the chocolate will set almost instantly on a cold surface, making it difficult to achieve an even, thin coating or to add toppings smoothly. This rapid setting can also cause the chocolate to crack once the strawberry begins to warm up. Allowing your strawberries to come to room temperature for at least 30 minutes before dipping ensures a smoother application, better adhesion, and a more uniform, crack-free finish.

Storage Best Practices
To keep your delectable chocolate-covered strawberries at their best, proper storage is essential. They are undoubtedly most delicious when consumed fresh, ideally on the same day they are made. However, if you have leftovers or are preparing them a little in advance, follow these guidelines:
- Refrigeration is Key: Store any leftover chocolate-covered strawberries in the refrigerator.
- Airtight Container: Place them in a single layer within an airtight container. This helps to prevent them from absorbing odors from other foods and minimizes moisture loss or gain.
- Prevent Sticking: If you must stack layers, separate them with a piece of parchment paper to prevent the chocolate from sticking together or becoming damaged.
- Optimal Freshness: While they can last for up to 48 hours in the fridge, the quality of the strawberries may diminish over time, becoming softer and potentially releasing more moisture. For the absolute best taste and texture, serve them within 24 hours.
- Serving Temperature: For optimal flavor, remove them from the refrigerator about 15-20 minutes before serving to allow the chocolate to slightly soften and the strawberries to lose their chill, enhancing their natural sweetness.
More Irresistible Strawberry Desserts
If you’re a fan of fresh, juicy strawberries, you’ll love exploring these other delightful strawberry-based dessert recipes:
- Strawberry Jello Pie Recipe: A light, refreshing, and incredibly easy pie perfect for summer gatherings.
- 2 Ingredient Strawberry Angel Food Cake: An unbelievably simple dessert that comes together in minutes with minimal fuss.
- 3 Ingredient Strawberry Icebox Cake Recipe: A classic no-bake dessert that’s creamy, cool, and bursting with strawberry flavor.
- No Bake Strawberry Cheesecake in a Jar: Individual serving cheesecakes that are perfect for picnics or parties.
- Easy Strawberry Cheesecake Cookies Recipe: Combining two favorite desserts into one chewy, flavorful cookie.
Explore More Decadent Chocolate Treats
For those who can’t get enough of chocolate, here are more tempting recipes that will satisfy your sweet cravings:
- Golden Graham S’mores Recipe: All the joy of s’mores without the campfire, in a convenient bar form.
- Chocolate Covered Cherries: Another classic fruit and chocolate pairing that’s elegant and delicious.
- Caramel Chocolate Microwave Fudge: Quick and easy fudge that delivers rich caramel and chocolate flavors.
- The Best Chocolate Fudge Recipe: A timeless recipe for rich, creamy, homemade chocolate fudge.
- Chocolate Covered Twinkies Recipe: A fun and indulgent treat that takes a classic snack to the next level.
We encourage you to try making these exquisite Chocolate Covered Strawberries and experience the joy of creating a gourmet dessert at home. Once you’ve made them, please come back and leave a comment sharing your thoughts and any creative twists you added. We can’t wait to hear about your delicious creations!
Pin
Chocolate Covered Strawberries
Ingredients
- 1 pint Strawberries
- 1 package 16 oz chocolate almond bark
- 1 package 16 oz white chocolate almond bark
- Chocolate sprinkles for topping
- White sprinkles for topping
Instructions
- Line a baking sheet with parchment paper or a silicone mat. This will prevent your dipped strawberries from sticking as they set.
- Prepare all of your chosen toppings by placing them in small, shallow bowls. This ensures they are ready for immediate use after dipping.
- Clean strawberries thoroughly under cold water and pat them completely dry with paper towels. Allow them to air dry at room temperature for an additional 10-15 minutes to eliminate all moisture.
- Add the appropriate amount of Almond Bark (or melting chocolate) to a microwave-safe bowl. The quantity will depend on how many strawberries you are coating; refer to the notes section for a guideline.
- Microwave the chocolate starting with a 1-minute interval on medium power, then remove and stir vigorously.
- Continue to heat the chocolate in short 20-30 second intervals, stirring well after each time. Frequent stirring ensures even melting and prevents the chocolate from burning.
- Remove the chocolate from the microwave just as it is almost completely melted, with a few small lumps remaining. Stir continuously until all lumps disappear and the chocolate is perfectly smooth and glossy. This final stirring with residual heat is key to preventing burnt chocolate and achieving the ideal consistency.
- Holding each strawberry by its stem, dip it into the melted chocolate, coating most of the berry. Allow excess chocolate to drip off, then immediately roll or dip into your desired sprinkles or toppings.
- Place the dipped and decorated strawberries carefully onto the parchment-covered baking sheet. Ensure they are not touching to prevent sticking.
- For drizzled decorations, melt a small amount of contrasting Almond Bark in the microwave. Transfer it to a plastic squeeze bottle or a piping bag with a fine tip, then drizzle artfully over the strawberries. Allow all chocolate to set for about 30 minutes at room temperature, or 10-15 minutes in the refrigerator.
Recipe Notes
Nutrition Facts
Pin This Now to Remember It Later
Pin Recipe
